Clinical Procedures
Bedside and outpatient procedures across internal medicine, emergency medicine, and primary care: indications, contraindications, anatomy, equipment, technique, post-procedure care, and complications for every common clinical procedure.
01 Sterile Technique & Universal Precautions
Sterile technique is the cornerstone of safe bedside procedures. Every invasive procedure — from a peripheral IV to a central line — depends on maintaining a sterile field to prevent healthcare-associated infections (HAIs). Central line-associated bloodstream infections (CLABSIs), catheter-associated urinary tract infections (CAUTIs), and surgical site infections remain leading causes of preventable morbidity and mortality in hospitalized patients. The principles of asepsis, barrier protection, and skin antisepsis apply universally and must be second nature to any clinician performing invasive procedures.
Proper sterile technique reduces CLABSI rates by up to 66% in ICU patients. Full barrier precautions (cap, mask, sterile gown, sterile gloves, full-body drape) combined with chlorhexidine skin prep and ultrasound guidance are the evidence-based "bundle" that has driven CLABSI rates to near-zero in top-performing institutions.
Levels of Asepsis
| Level | Definition | Examples |
|---|---|---|
| Clean | Reduces microbial load; hand hygiene, clean gloves | Venipuncture, IM injection, simple dressing change |
| Aseptic (no-touch) | Prevents contamination of key sites | Peripheral IV, NG tube placement |
| Sterile field | All instruments/drapes sterile; sterile gloves | Lumbar puncture, thoracentesis, paracentesis, joint aspiration |
| Full barrier (maximal) | Cap, mask, sterile gown, sterile gloves, full-body drape | Central venous catheter, arterial line, chest tube |
| Operative sterile | OR-level sterility, surgical scrub | Tracheostomy, open surgical procedures |
Skin Antisepsis Agents
| Agent | Mechanism | Onset | Duration | Notes |
|---|---|---|---|---|
| Chlorhexidine gluconate 2% + alcohol 70% | Disrupts cell membranes | 15–30 sec | ≥ 6 hours | First-line for CVC, arterial line; avoid eyes/ears; allow to dry fully (flammable) |
| Povidone-iodine 10% | Oxidizes microbial proteins | 1–2 min wet contact | ~ 1 hour | Use in chlorhexidine allergy; acceptable for neonates < 2 months |
| Isopropyl alcohol 70% | Denatures proteins | Immediate | Brief | For venipuncture, IM/SC injections; inadequate alone for deep procedures |
| Hexachlorophene | Disrupts cell wall | Slow (hours) | Cumulative | Rarely used; neurotoxic in neonates |
Hand Hygiene & PPE
The WHO "five moments" for hand hygiene include before patient contact, before aseptic procedures, after body fluid exposure, after patient contact, and after contact with patient surroundings. Alcohol-based hand rub (60–95% ethanol) is preferred for routine hygiene; soap and water are required for visibly soiled hands or after contact with C. difficile or norovirus (spores are resistant to alcohol). Personal protective equipment (PPE) includes gloves, gown, mask, and eye protection; donning and doffing sequences matter to prevent self-contamination.
Standard (Universal) Precautions
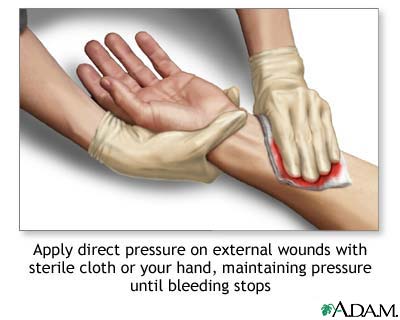
All patient body fluids should be treated as potentially infectious. Gloves for any contact with blood, mucous membranes, non-intact skin, or body fluids. Gowns when splashing is anticipated. Masks and eye protection during any procedure with aerosol/splash risk (intubation, chest tube, wound irrigation). Sharps must be disposed of immediately in rigid puncture-resistant containers — never recap needles.
02 Informed Consent & Pre-Procedure Time-Out
Informed consent is both an ethical imperative and a legal requirement for non-emergent procedures. Patients must understand the nature of the procedure, its risks, benefits, and reasonable alternatives (including no procedure). Capacity is procedure-specific and must be assessed at the time of consent; documentation should include a quoted description of the patient's understanding.
Elements of Valid Informed Consent
| Element | Requirement |
|---|---|
| Capacity | Patient can understand information, appreciate consequences, reason about options, and express a choice |
| Disclosure | Nature of procedure, indications, risks (including rare but serious), benefits, alternatives, risks of no treatment |
| Understanding | Confirmed by teach-back; use interpreter when needed |
| Voluntariness | Free from coercion; not under duress |
| Documentation | Signed consent form, witnessed; progress note describing discussion |
Implied consent applies when a patient lacks capacity and delay would cause serious harm (e.g., emergent intubation in a crashing patient, needle decompression for tension pneumothorax). Document the emergency, the lack of surrogate, and the clinical necessity.
Universal Protocol & Time-Out
The Joint Commission Universal Protocol mandates three steps before any invasive procedure: (1) pre-procedure verification of patient, procedure, and site; (2) site marking (when laterality applies); and (3) a time-out immediately before starting, involving all team members.
| Time-Out Element | Verification |
|---|---|
| Correct patient | Two identifiers (name + DOB or MRN) |
| Correct procedure | Read aloud from consent form |
| Correct site/side | Visible marked site; imaging available |
| Consent on chart | Signed, dated, witnessed |
| Allergies & anticoagulation | Verified; INR/platelets reviewed |
| Equipment available | Sterile tray, ultrasound, emergency meds |
| Antibiotics if indicated | Administered within 60 min of incision |
Anticoagulation & Procedure Risk
| Procedure Risk | Threshold | Examples |
|---|---|---|
| Low bleeding risk | INR < 3.0, platelets > 20 K | Peripheral IV, thoracentesis, paracentesis, arterial line |
| Moderate risk | INR < 1.5, platelets > 50 K | Lumbar puncture, CVC placement, chest tube |
| High bleeding risk | INR < 1.3, platelets > 75–100 K | Epidural, pericardiocentesis, deep organ biopsy |
Pre-Procedure Checklist
Before any invasive bedside procedure, confirm: (1) indication documented; (2) consent signed; (3) time-out performed; (4) labs reviewed (CBC, coags as appropriate); (5) equipment gathered; (6) monitors in place (SpO2, telemetry, BP cycling); (7) emergency drugs/airway at bedside; (8) assistant briefed; (9) post-procedure plan (imaging, orders).
03 Local Anesthesia & Procedural Sedation
Adequate analgesia improves patient cooperation, reduces stress response, and lowers the risk of complications. Local anesthetics work by blocking voltage-gated sodium channels in nerve fibers, preventing depolarization. Amide anesthetics (lidocaine, bupivacaine) are metabolized hepatically; esters (procaine, tetracaine) are metabolized by plasma cholinesterases and have higher allergy risk (PABA metabolite).
Common Local Anesthetics
| Agent | Class | Onset | Duration | Max Dose (plain) | Max Dose (with epi) |
|---|---|---|---|---|---|
| Lidocaine 1–2% | Amide | 2–5 min | 30–60 min | 4.5 mg/kg (max 300 mg) | 7 mg/kg (max 500 mg) |
| Bupivacaine 0.25–0.5% | Amide | 5–10 min | 4–8 hr | 2 mg/kg (max 175 mg) | 3 mg/kg (max 225 mg) |
| Ropivacaine 0.2–0.5% | Amide | 10–20 min | 3–6 hr | 3 mg/kg | 3.5 mg/kg |
| Procaine 1–2% | Ester | 5 min | 30–60 min | 7 mg/kg | 9 mg/kg |
| Tetracaine (topical) | Ester | 1–3 min | 15–30 min | 1.5 mg/kg | — |
Local Anesthetic Systemic Toxicity (LAST)
LAST occurs with intravascular injection or exceeding maximum dose. Early signs include perioral numbness, tinnitus, metallic taste, and agitation. Progression leads to seizures, then cardiovascular collapse (bupivacaine is the most cardiotoxic; prolongs QRS, induces refractory arrhythmias). Treatment is 20% intralipid emulsion (1.5 mL/kg bolus, then 0.25 mL/kg/min infusion) in addition to ACLS — with modifications: avoid vasopressin, reduce epinephrine doses (≤ 1 mcg/kg), avoid calcium channel blockers and beta-blockers.
Stop injection → call for help → secure airway → treat seizures with benzodiazepines (avoid propofol if hemodynamically unstable) → begin lipid emulsion 20% (bolus + infusion) → modified ACLS for cardiac arrest. Prolonged resuscitation (> 1 hour) may be necessary.
Techniques to Reduce Injection Pain
- Buffer lidocaine with sodium bicarbonate 8.4% (1 mL per 9 mL lidocaine) to raise pH
- Warm the anesthetic to body temperature
- Use small (27–30 G) needle
- Inject slowly through previously anesthetized skin
- Topical EMLA or LET (lidocaine-epinephrine-tetracaine) for children or awake patients
Procedural Sedation Levels
| Level | Responsiveness | Airway | Spontaneous Ventilation | Cardiovascular |
|---|---|---|---|---|
| Minimal (anxiolysis) | Normal to verbal | Unaffected | Unaffected | Unaffected |
| Moderate (conscious sedation) | Purposeful to verbal/tactile | No intervention required | Adequate | Usually maintained |
| Deep sedation | Purposeful only after repeated/painful stimulation | May require intervention | May be inadequate | Usually maintained |
| General anesthesia | Unarousable | Often requires intervention | Frequently inadequate | May be impaired |
Common Procedural Sedation Agents
| Agent | Dose | Onset | Duration | Notes |
|---|---|---|---|---|
| Midazolam | 0.02–0.1 mg/kg IV | 1–3 min | 30–60 min | Benzodiazepine; anxiolysis, amnesia; reverse with flumazenil |
| Fentanyl | 0.5–2 mcg/kg IV | 1–2 min | 30–60 min | Opioid analgesic; chest wall rigidity at high doses; reverse with naloxone |
| Ketamine | 1–2 mg/kg IV; 4–5 mg/kg IM | 1 min IV | 10–20 min | Dissociative; preserves airway reflexes; emergence reactions; ICP/HTN |
| Propofol | 0.5–1 mg/kg IV, then titrate | 30–60 sec | 3–10 min | Hypotension, apnea; no analgesia; requires airway skills |
| Etomidate | 0.1–0.2 mg/kg IV | 30–60 sec | 3–5 min | Hemodynamically stable; myoclonus; adrenal suppression (single dose generally safe) |
| Dexmedetomidine | 1 mcg/kg load over 10 min | 5–10 min | 1–2 hr | α2-agonist; minimal respiratory depression; bradycardia, hypotension |
04 Peripheral IV & Ultrasound-Guided PIV
Peripheral venous access is the most commonly performed invasive procedure in medicine. A functional, large-bore PIV is the foundation of resuscitation: two 16-gauge PIVs can deliver fluids faster than a triple-lumen central line because flow is proportional to the fourth power of catheter radius divided by length (Poiseuille's law).
Indications
- Fluid resuscitation, blood transfusion, medication administration
- Contrast administration for imaging
- Laboratory blood draws when repeated sampling needed
- Access for induction of anesthesia or procedural sedation
Catheter Sizes & Flow Rates
| Gauge | Color | Max Flow (gravity) | Typical Use |
|---|---|---|---|
| 14 G | Orange | ~ 330 mL/min | Trauma, massive transfusion |
| 16 G | Gray | ~ 220 mL/min | Resuscitation, surgery |
| 18 G | Green | ~ 105 mL/min | Blood products, routine fluids |
| 20 G | Pink | ~ 60 mL/min | Maintenance IV, medications |
| 22 G | Blue | ~ 35 mL/min | Pediatric, frail veins |
| 24 G | Yellow | ~ 20 mL/min | Neonatal, very small veins |
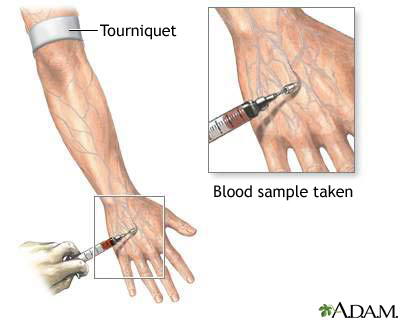
Anatomy & Site Selection
Preferred sites: dorsum of the hand, cephalic vein at the wrist, median cubital vein at the antecubital fossa, forearm veins. Avoid veins over joints (positional occlusion), the dominant hand, AV fistula arm, side of mastectomy with lymph node dissection, and paralyzed extremities. The antecubital fossa is ideal for emergency large-bore access but is prone to kinking with elbow flexion.
Equipment
- Gloves, tourniquet, alcohol/chlorhexidine swab, gauze
- Angiocatheter of appropriate gauge
- Saline flush, extension tubing, IV connector, tape/transparent dressing (Tegaderm)
- Ultrasound with high-frequency linear probe (for USGPIV)
Technique — Landmark Approach
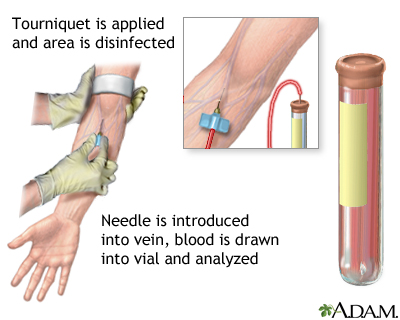
- Apply tourniquet 10 cm proximal to the intended site; have patient pump fist
- Palpate and select vein; cleanse skin with alcohol in concentric circles
- Anchor vein distal to insertion site with non-dominant thumb
- Enter skin at 15–30° bevel up; advance until flash seen in catheter hub
- Lower angle to skin; advance catheter 2–3 mm further to ensure catheter (not just needle) is intraluminal
- Advance catheter over needle while holding needle stationary
- Release tourniquet, occlude vein proximally, remove needle, attach flush/extension
- Flush with 3–5 mL saline; verify no extravasation; secure with transparent dressing
Ultrasound-Guided PIV Technique
For patients with difficult access, use a high-frequency linear probe (10–15 MHz). Identify a suitable vein > 4 mm deep but < 1.5 cm from skin (deeper veins risk infiltration and premature catheter failure). Use a longer catheter (1.75–2.5 inches). Short-axis (out-of-plane) approach is faster for beginners; long-axis (in-plane) allows continuous visualization of needle tip.
Complications
| Complication | Prevention/Management |
|---|---|
| Infiltration/extravasation | Frequent site checks; stop infusion; elevate; warm compress (except vesicants — cold) |
| Phlebitis | Remove catheter; warm compress; consider antibiotics if purulent |
| Hematoma | Pressure, elevation |
| Arterial puncture | Recognize pulsatile bright red blood; direct pressure 5–10 min |
| Nerve injury | Avoid multiple passes; stop if patient reports shooting pain |
| Catheter embolism | Never reinsert needle into catheter after withdrawal |
| Thrombophlebitis | Rotate sites every 72–96 hours per policy |
05 Arterial Line Placement
Arterial catheterization provides continuous blood pressure monitoring and convenient access for repeated arterial blood gas sampling. It is a cornerstone of critical care for any hemodynamically unstable patient, those on vasoactive infusions, or patients requiring frequent ABG monitoring (ARDS, severe shock, major surgery).
Indications
- Hemodynamic instability requiring vasopressor titration
- Frequent arterial blood gas sampling
- Inaccurate non-invasive BP (severe obesity, burns, arrhythmia)
- Cardiac/neuro/vascular surgery requiring beat-to-beat monitoring
- Therapeutic hypothermia, controlled hypotension
Contraindications
Absolute: infection at site, absent collateral circulation, severe peripheral vascular disease, thromboangiitis obliterans. Relative: coagulopathy, previous surgery at site, Raynaud's phenomenon, prior vascular procedure on the same limb.
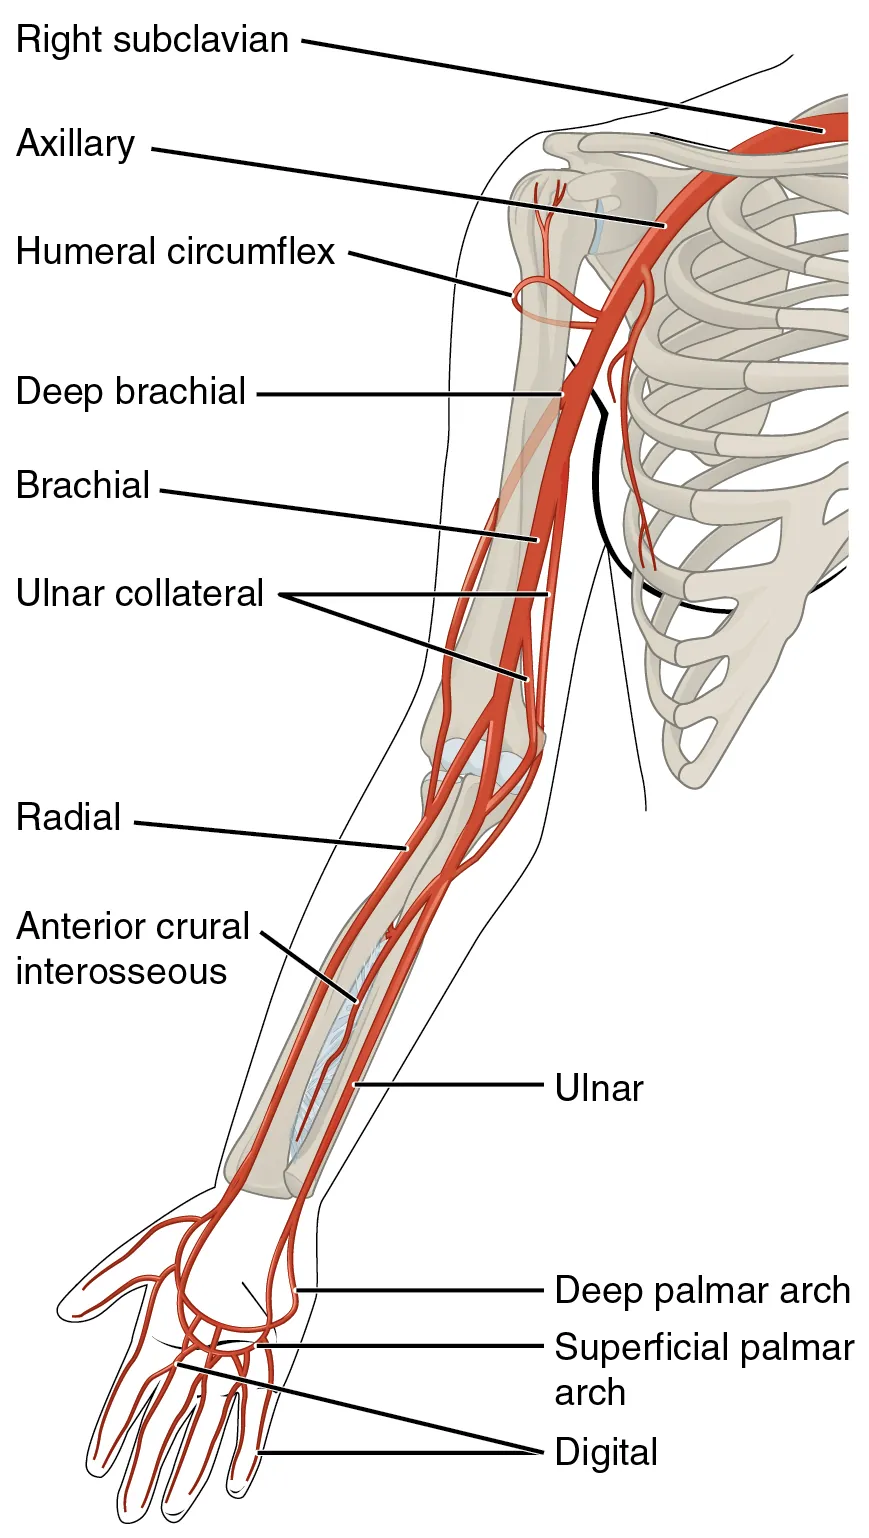
Site Selection & Anatomy
| Site | Pros | Cons |
|---|---|---|
| Radial (first-line) | Accessible, collateral ulnar flow, easy to compress | Vasospasm, small caliber; failure in shock |
| Femoral | Large vessel, reliable in shock | Retroperitoneal bleed; infection; difficult to keep clean |
| Axillary/brachial | Proximal waveform; large vessel | Median nerve injury; limited collateral |
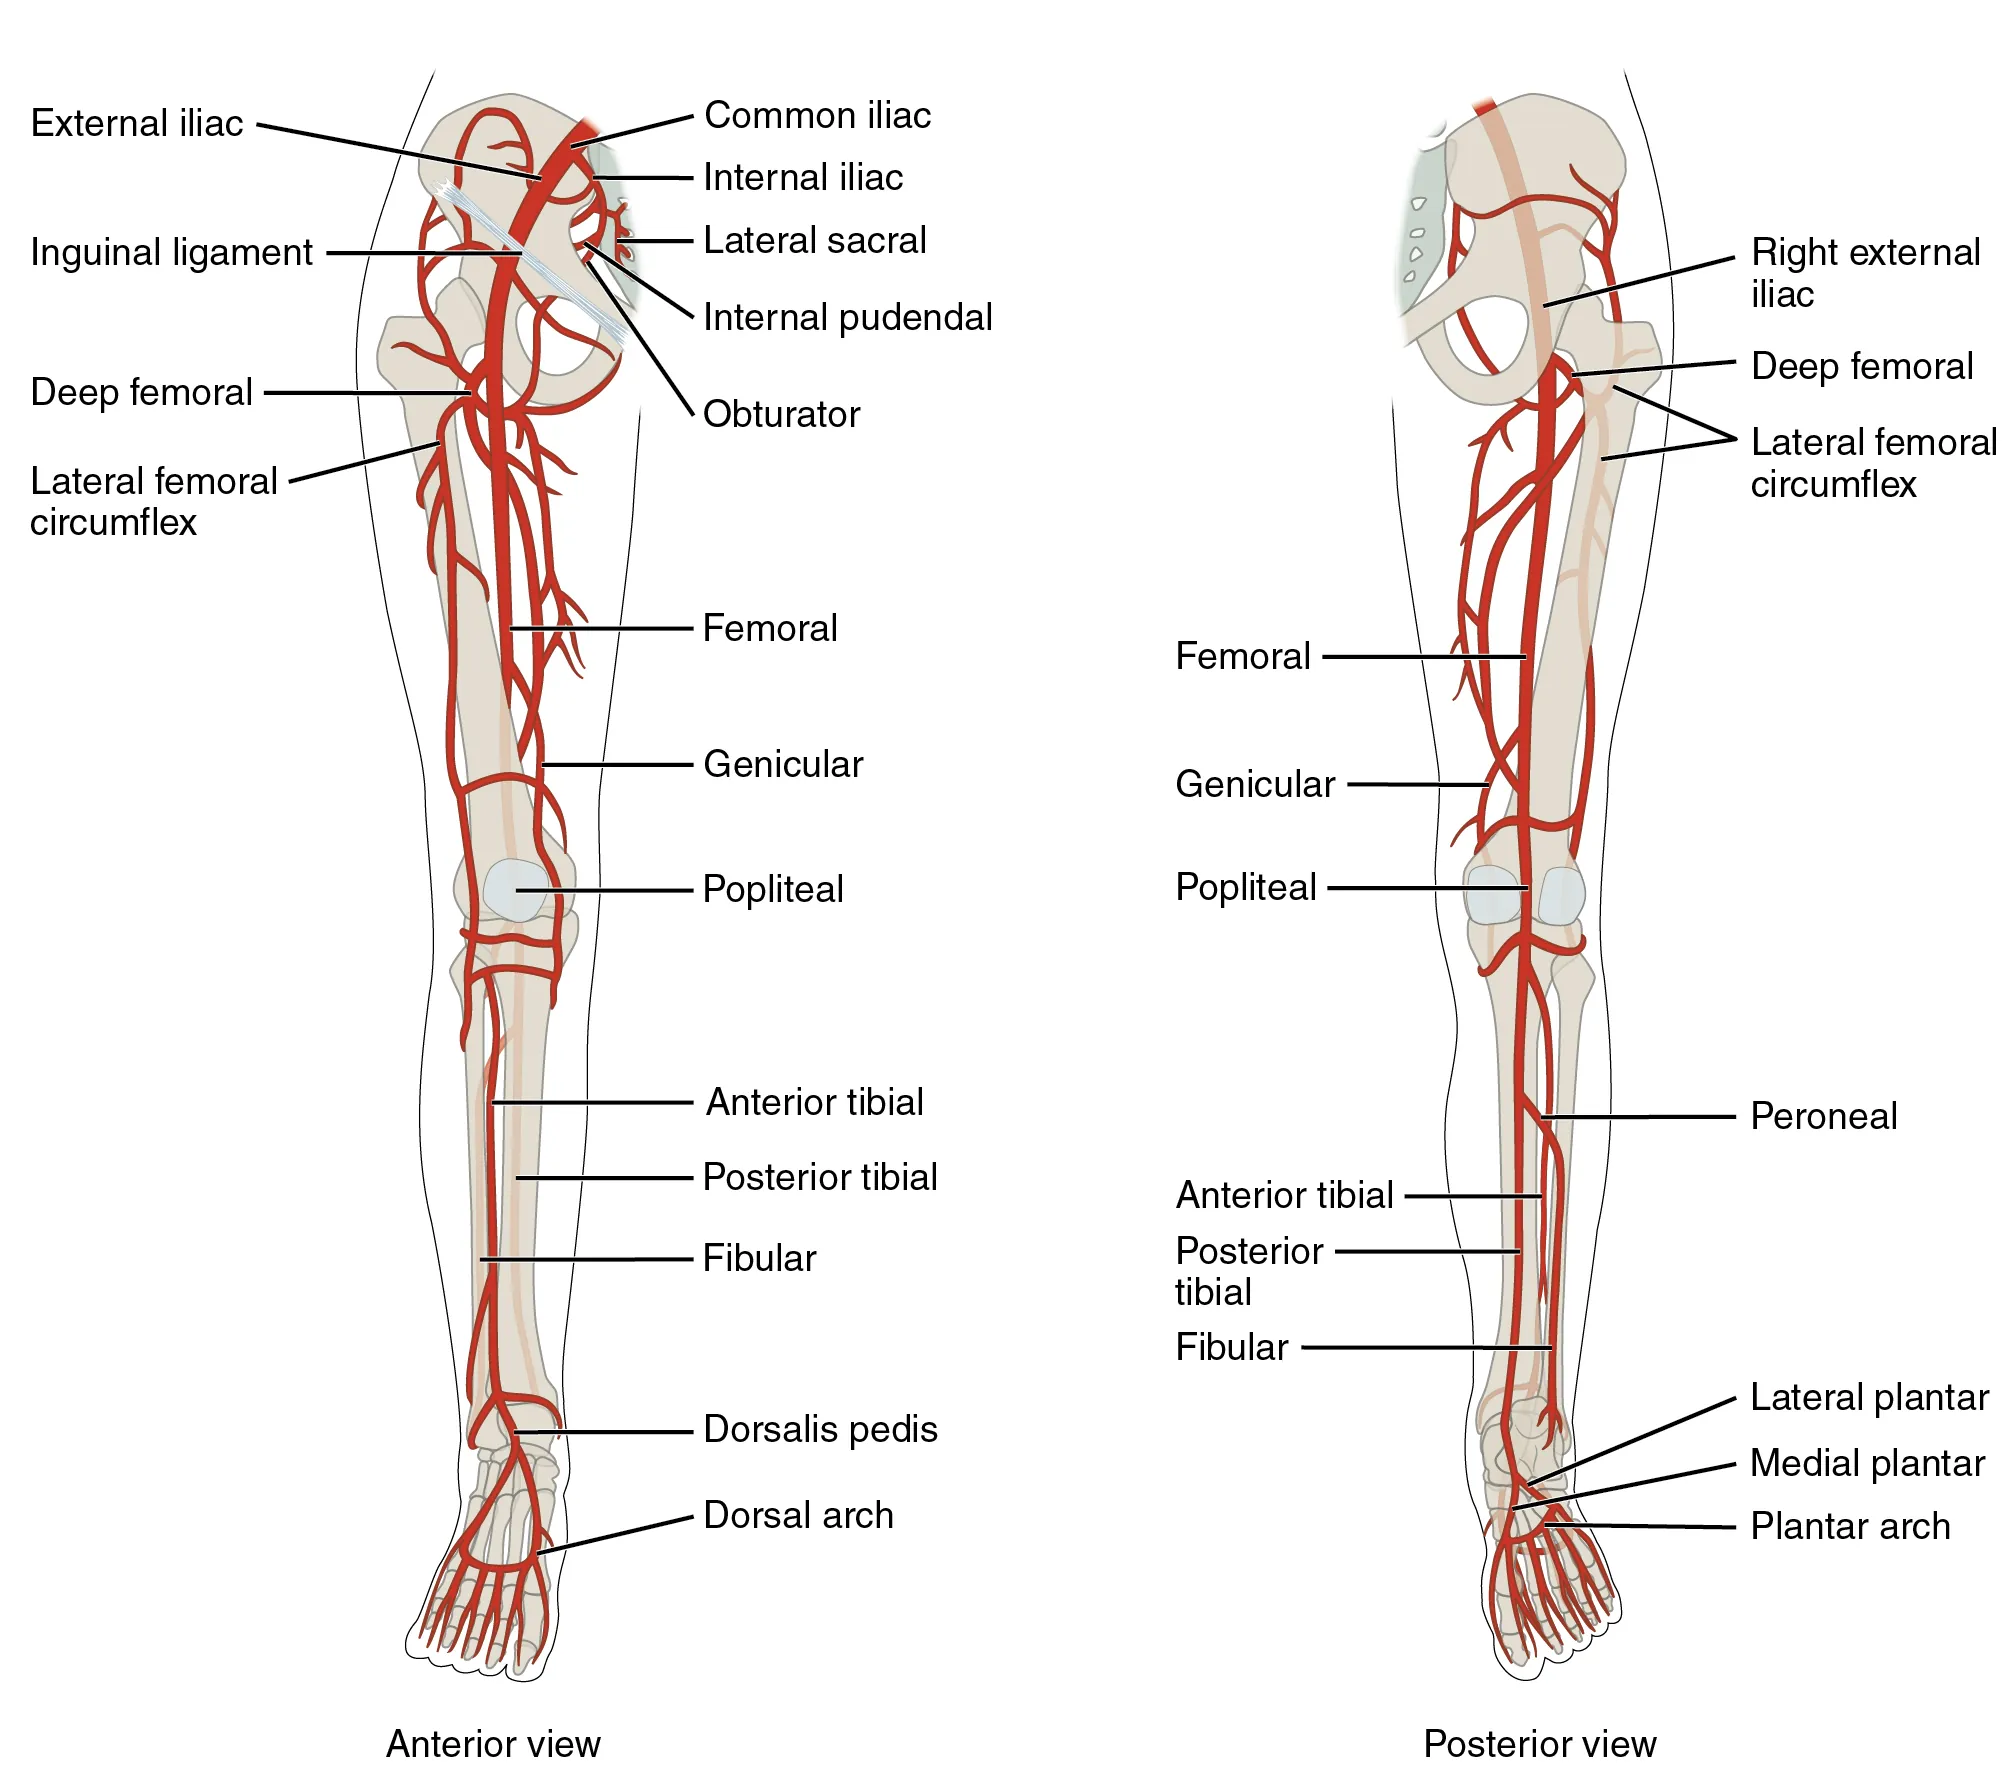
| Dorsalis pedis | Alternative when radial fails | Damped waveform; plantar arch integrity required |
| Ulnar | If radial unsuitable | Risk of hand ischemia if radial compromised |
Modified Allen's Test
Historically performed before radial cannulation to confirm ulnar collateral circulation: compress both radial and ulnar arteries, have the patient clench fist, release ulnar pressure, observe palmar blush within 5–7 seconds. Modern evidence suggests poor predictive value for ischemic complications; many centers omit it or use Doppler/pulse oximetry plethysmography instead.
Equipment
- Arterial catheter kit: 20-gauge integrated catheter/wire (Arrow) or over-the-needle angiocatheter
- Pressure tubing, transducer, 500 mL saline bag with pressure bag at 300 mmHg
- Sterile prep, drapes, gloves, mask
- Lidocaine 1%, suture or adhesive securement, transparent dressing
- Ultrasound with sterile probe cover (linear probe)
Technique — Radial Artery (Seldinger/Integrated Catheter)
- Position wrist in slight dorsiflexion over rolled towel; secure with tape
- Palpate radial pulse at the proximal wrist crease, 1–2 cm proximal to the styloid
- Sterile prep and drape; infiltrate 0.5–1 mL lidocaine
- Enter skin at 30–45° angle bevel up, directly over the pulse
- Advance until flash; lower angle and advance 1–2 mm further
- Integrated wire: advance wire through needle into artery; thread catheter over wire
- Connect to pressurized transducer; confirm arterial waveform; level to phlebostatic axis
- Secure with suture or adhesive; transparent dressing
Ultrasound-Guided Technique
Ultrasound (short- or long-axis) improves first-pass success, particularly in hypotensive or obese patients. Identify the pulsatile, non-compressible radial artery medial to the radial styloid; advance needle under real-time visualization. In-plane (long-axis) allows continuous tip visualization.
Complications
| Complication | Frequency | Management |
|---|---|---|
| Hematoma | Common | Direct pressure 5 min |
| Vasospasm | Common | Warm compress; topical nitroglycerin; remove catheter |
| Thrombosis | 5–25% | Usually asymptomatic; remove catheter; monitor distal perfusion |
| Distal ischemia | < 1% | Remove immediately; vascular surgery consult |
| Infection | < 1% | Remove; cultures; antibiotics if bacteremic |
| Nerve injury | Rare | Avoid multiple passes; careful anatomy |
| Retrograde embolism | Rare | Flush slowly (< 2 mL); limit back-flush |
06 Central Venous Catheter Placement
Central venous catheters (CVCs) provide reliable access for vasoactive infusions, central venous pressure monitoring, rapid resuscitation, vesicant chemotherapy, total parenteral nutrition, and access when peripheral options are exhausted. Ultrasound guidance has become the standard of care for internal jugular and femoral CVCs, reducing complications and improving first-pass success.
Indications
- Administration of vasopressors, hypertonic solutions, vesicants, TPN
- Hemodynamic monitoring (CVP, ScvO2, pulmonary artery catheter)
- Temporary dialysis or plasmapheresis access
- Transvenous pacing
- Inadequate peripheral access
- Rapid resuscitation (though large-bore PIVs are faster)
Site Selection
| Site | Pros | Cons | Infection Risk |
|---|---|---|---|
| Internal jugular (right preferred) | Straight course to SVC; lowest PTX risk; compressible | Carotid puncture; neck hematoma; requires head-down position | Intermediate |
| Subclavian | Most comfortable; lowest infection risk; stable anatomy | PTX 1–3%; non-compressible; avoid in coagulopathy | Lowest |
| Femoral | Fastest in cardiac arrest; no PTX risk; easy in coagulopathy | Highest infection/DVT risk; limits mobility; groin issues | Highest |
Anatomy
Right IJ: lateral to the carotid artery at the apex of the triangle formed by the sternal and clavicular heads of the sternocleidomastoid. The vein is superficial (1–2 cm) and typically lateral and anterior to the carotid. Subclavian: vein runs posterior to the medial third of the clavicle, anterior to the subclavian artery and brachial plexus, above the first rib and pleural apex. Femoral: NAVEL (Nerve-Artery-Vein-Empty-Lymphatics) lateral to medial; the vein lies medial to the femoral artery, 1 cm below the inguinal ligament.
Equipment & Full Barrier Precautions
- Cap, mask, sterile gown, sterile gloves, full-body drape
- Chlorhexidine-alcohol prep
- CVC kit: needle, guidewire, dilator, triple-lumen catheter, scalpel, suture
- Lidocaine 1%, saline flushes, heparinized saline locks for each lumen
- Ultrasound with sterile probe cover, sterile gel
- Biopatch, transparent dressing
Seldinger Technique (Step-by-Step)
- Position patient: Trendelenburg 15–20° for IJ/subclavian (fills vein, prevents air embolism); head turned away slightly
- Full barrier precautions, sterile prep and drape from ear to nipple
- Ultrasound in sterile cover; identify vein (compressible, non-pulsatile)
- Anesthetize skin and deeper tissues with lidocaine
- Introduce finder needle at angle 30–45° under ultrasound guidance; aspirate continuously
- Once venous blood aspirated freely, remove syringe, occlude hub to prevent air embolism
- Pass guidewire through needle — should advance easily without resistance; ≤ 20 cm to avoid arrhythmias
- Remove needle over wire while maintaining wire control
- Nick skin with scalpel; pass dilator over wire; remove dilator
- Pass catheter over wire; remove wire through catheter
- Aspirate and flush all ports; cap with needleless connectors
- Suture catheter; apply biopatch and transparent dressing
- Post-procedure chest X-ray (IJ/subclavian): confirm tip at cavo-atrial junction; rule out PTX
(1) Passing the wire before confirming venous location — arterial dilation is catastrophic. (2) Letting go of the wire — can embolize into the heart. (3) Failing to place a sterile occlusive dressing post-insertion. (4) Removing the catheter if it was placed in an artery without vascular surgery consultation (apply pressure and arrange repair).
Confirming Venous Placement Before Dilation
- Ultrasound visualization of wire in vein (long-axis confirmation)
- Transduce pressure via needle or angiocatheter (venous < 15 mmHg; arterial waveform if in artery)
- Color of blood and pulsatility (unreliable in hypoxemia/hypotension)
- Manometry with sterile tubing held vertically
Complications
| Complication | Site Risk | Management |
|---|---|---|
| Arterial puncture | IJ > subclavian | Withdraw needle; pressure; if dilated, vascular surgery consult |
| Pneumothorax | Subclavian > IJ | Confirm by CXR; chest tube if symptomatic/large |
| Hemothorax | Subclavian, IJ | CXR; chest tube; surgical evaluation |
| Air embolism | Any site | Left lateral decubitus, Trendelenburg; 100% O2; aspirate from catheter |
| Cardiac arrhythmia | Wire/tip irritation | Withdraw wire/catheter 1–2 cm |
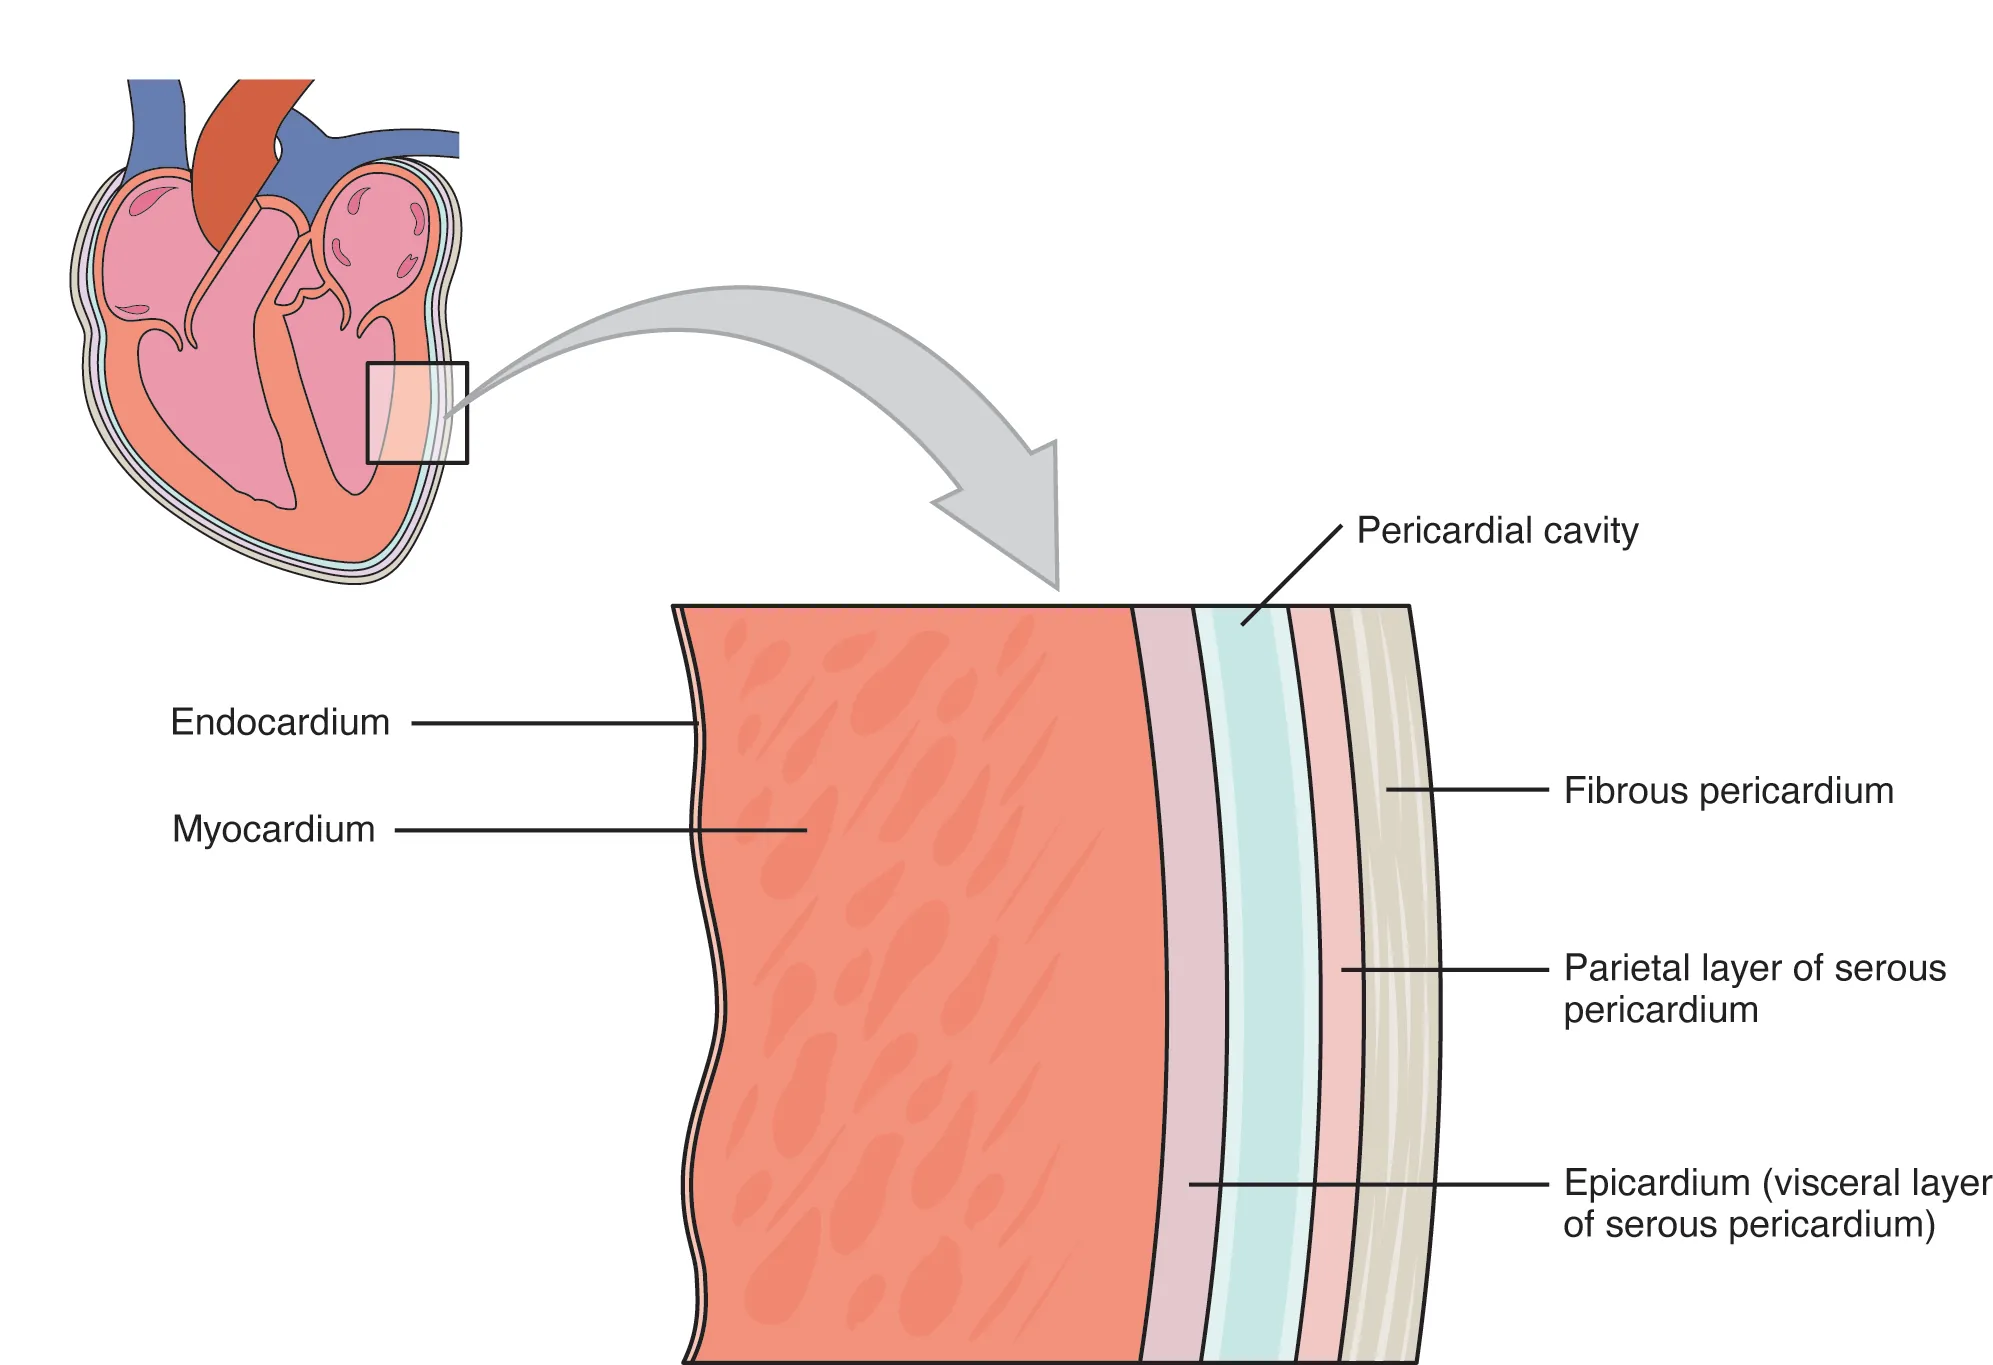
| Cardiac perforation/tamponade | Deep catheter | Rare; echo; pericardiocentesis; remove CVC |
| CLABSI | Femoral > IJ > subclavian | Remove catheter; blood cultures; antibiotics |
| Venous thrombosis | Femoral > subclavian > IJ | Ultrasound; anticoagulation if symptomatic |
| Nerve injury | Brachial plexus (subclavian) | Usually self-limited |
| Thoracic duct injury | Left IJ/subclavian | Chylothorax; thoracic surgery |
07 Intraosseous, PICC & Port Access
Intraosseous (IO) Access
IO access provides rapid vascular access when peripheral IV placement fails in emergencies. The non-collapsible marrow space allows infusion of any medication or fluid that can be given through a PIV, at similar rates. Modern devices (EZ-IO drill) achieve placement in < 30 seconds with high success rates.
Indications
- Any resuscitation when IV access fails or is delayed > 60–90 seconds
- Cardiac arrest, severe shock, trauma, anaphylaxis
- Inaccessible peripheral veins (burns, obesity, IVDU)
Contraindications
Absolute: fracture of the target bone, previous IO within 48 hours at same site, prosthesis or orthopedic hardware at site, infection overlying site, osteogenesis imperfecta. Relative: difficult landmarks (obesity).
Sites
| Site | Landmark | Best For |
|---|---|---|
| Proximal tibia (adult) | 2 cm medial and 1 cm proximal to tibial tuberosity | First-line adults and children |
| Proximal humerus | Greater tubercle with arm adducted, hand on abdomen | Higher flow rates; adult resuscitation |
| Distal tibia | 2 cm proximal to medial malleolus | Alternative if proximal tibia unusable |
| Distal femur | Midline, 1 cm above patella | Pediatric alternative |
| Sternum | Manubrium (specialized devices) | Military trauma |
Technique (EZ-IO)
- Identify landmark, cleanse skin
- Select needle size: 15 mm (pink, pediatric), 25 mm (blue, adult), 45 mm (yellow, obese/humerus)
- Insert perpendicular to bone; drill until sudden release (loss of resistance as cortex penetrated)
- Remove trocar; confirm placement (needle stands unsupported; aspirate marrow)
- Flush with 10 mL saline (2 mL in pediatrics); lidocaine 40 mg slow push for awake patients (extremely painful infusion)
- Attach extension tubing; secure; pressure bag for rapid infusion
- Replace with definitive IV/central access within 24 hours
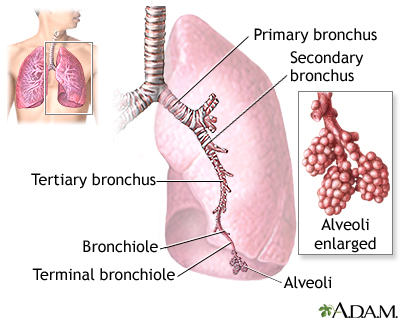
PICC Lines
Peripherally inserted central catheters are long catheters (40–60 cm) placed via the basilic, brachial, or cephalic vein under ultrasound guidance, with the tip advanced to the cavo-atrial junction. Used for intermediate-term (weeks to months) IV antibiotics, TPN, chemotherapy. Lower CLABSI risk than traditional CVCs but higher thrombosis risk (especially in cancer patients).
Implanted Ports (Port-a-Cath)
Subcutaneous reservoir connected to a central venous catheter, used for long-term intermittent access (chemotherapy, chronic infusions). Access with a non-coring Huber needle (90° for sitting patient, angled for supine) using strict sterile technique. Always aspirate for blood return before infusion; flush with saline then heparin lock (100 U/mL, 5 mL typical).
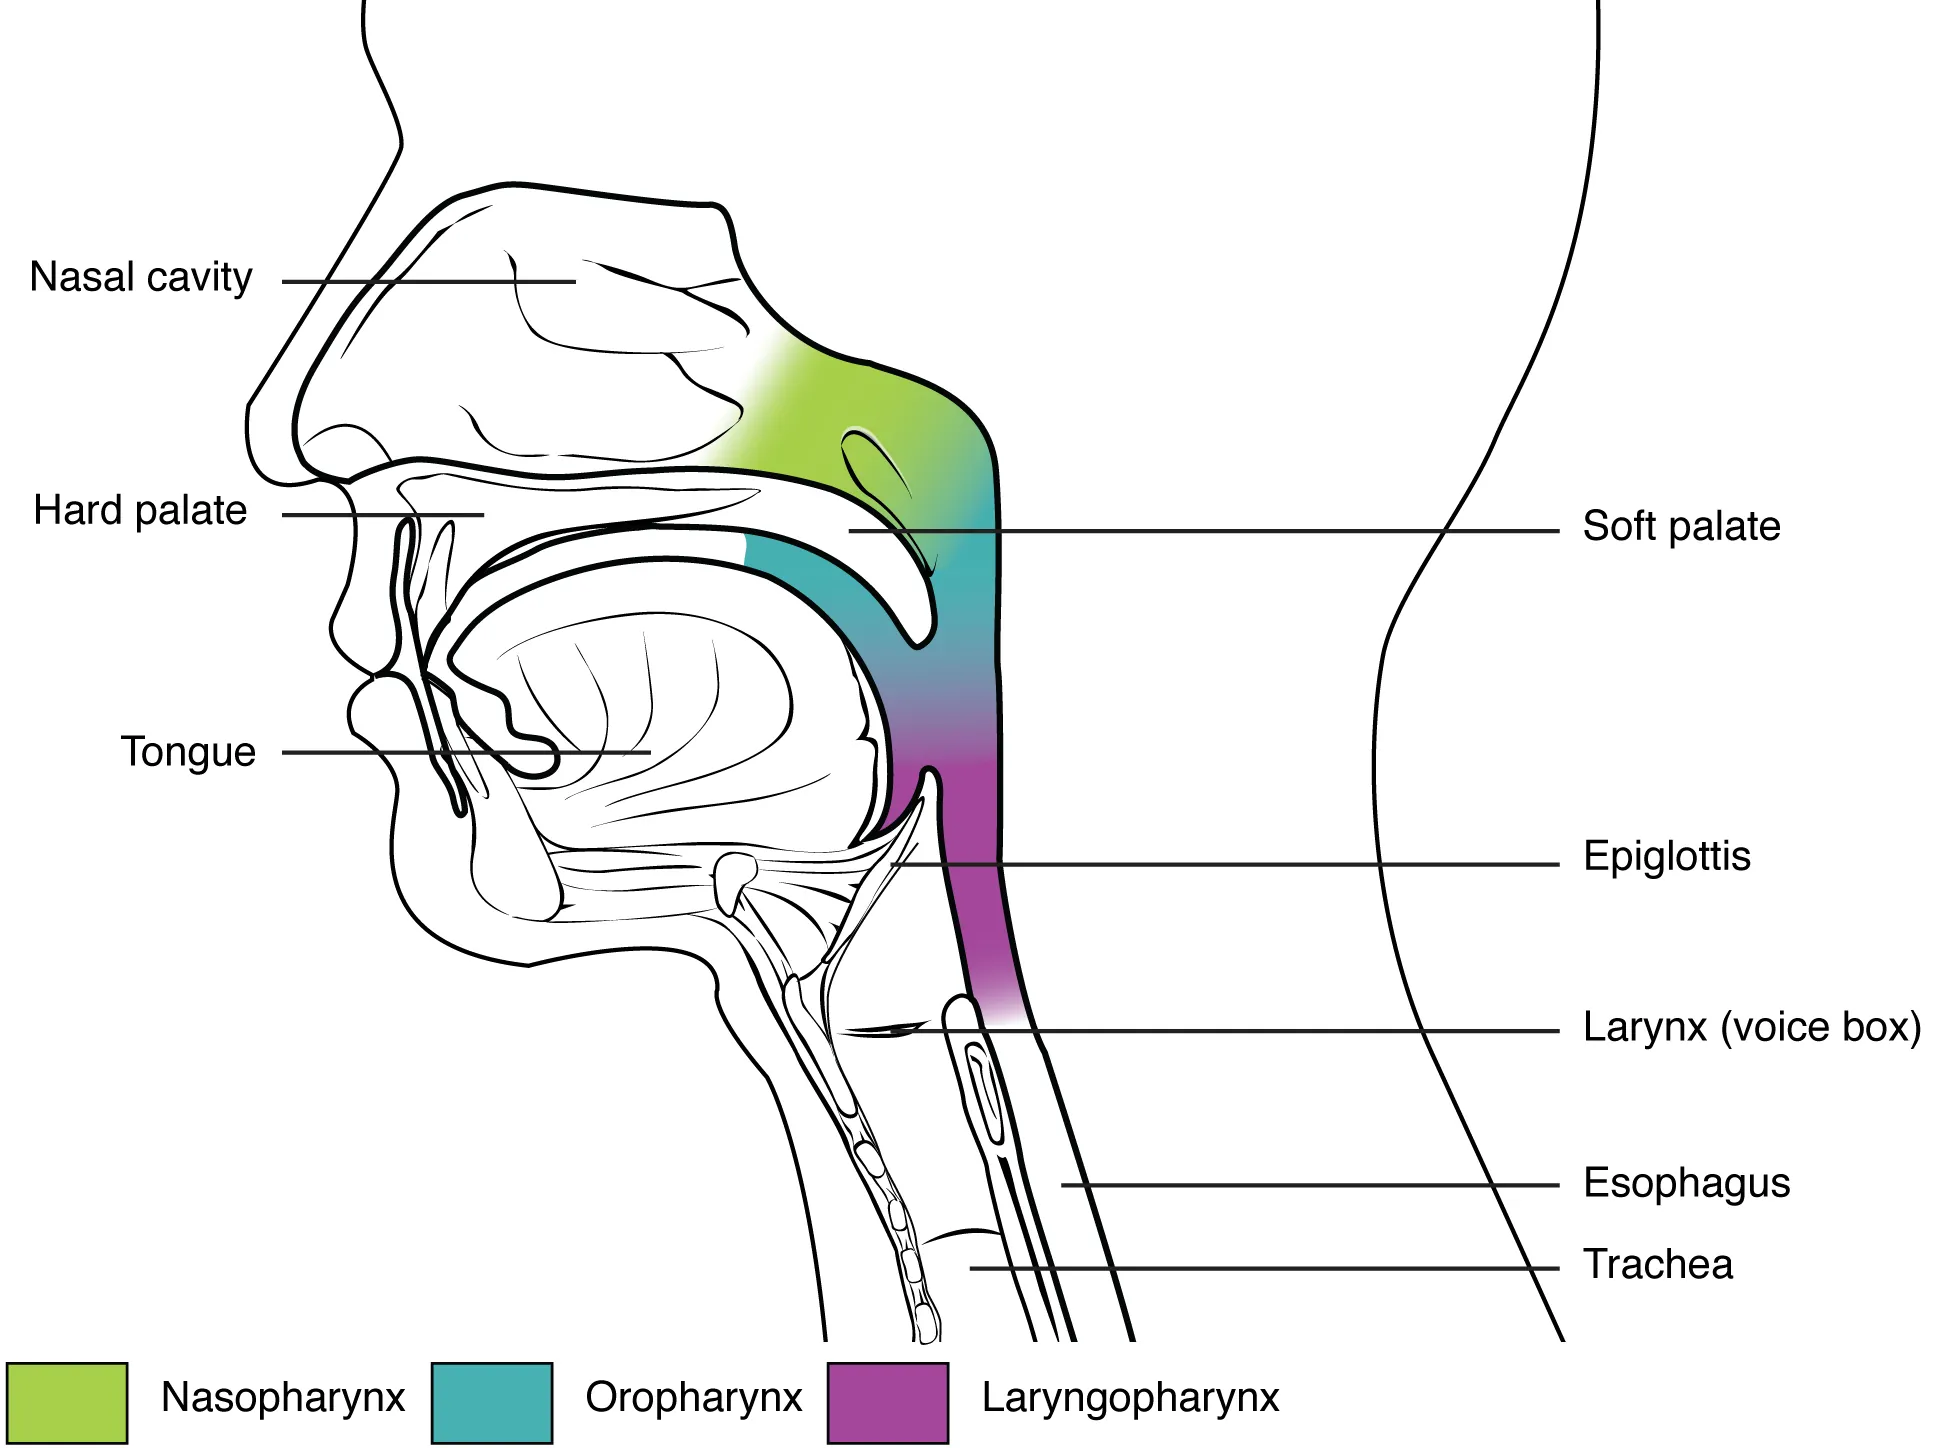
08 Basic Airway & Bag-Mask Ventilation
Basic airway management is the most important skill in resuscitation. The ability to deliver effective bag-mask ventilation is more valuable than intubation, because inadequate oxygenation during intubation attempts is what causes hypoxic injury and cardiac arrest. Airway management follows a stepwise escalation: positioning, suctioning, adjuncts, bag-mask ventilation, supraglottic airway, endotracheal tube, surgical airway.
Airway Assessment — LEMON & MOANS
| Mnemonic | Assessment |
|---|---|
| Look externally | Facial trauma, short neck, large tongue, beard |
| Evaluate 3-3-2 | 3 fingers mouth opening, 3 fingers mentum-hyoid, 2 fingers hyoid-thyroid |
| Mallampati | Class I–IV visualization of posterior pharynx |
| Obstruction | Stridor, foreign body, epiglottitis, angioedema |
| Neck mobility | C-collar, arthritis, cervical fusion |
MOANS (difficult mask ventilation): Mask seal (beard), Obesity/Obstruction, Age > 55, No teeth, Stiff lungs/Snoring.
Positioning
The sniffing position (neck flexed on torso, head extended at atlanto-occipital joint) aligns the oral, pharyngeal, and laryngeal axes. In obese patients, the "ramped position" (ear at level of sternal notch) improves both mask ventilation and laryngoscopic view. Maintain head neutral with inline stabilization in trauma.
Airway Adjuncts
| Device | Sizing | Use | Contraindication |
|---|---|---|---|
| Oropharyngeal airway (OPA) | Corner of mouth to angle of mandible | Unconscious patients with absent gag | Intact gag reflex (vomiting/laryngospasm) |
| Nasopharyngeal airway (NPA) | Nares to tragus | Conscious/semi-conscious; preserves gag | Suspected basilar skull fracture, facial trauma, coagulopathy |
| Laryngeal mask airway (LMA) | Based on body weight (e.g., #4 for 50–70 kg) | Rescue airway, brief surgery, failed intubation | Not definitive; no aspiration protection; high airway pressures |
| i-gel / supraglottic | Weight-based | Rescue; prehospital | Full stomach (relative) |
Bag-Valve-Mask (BVM) Technique
- Select appropriate mask size (bridge of nose to chin cleft)
- Position patient (sniffing/ramped)
- Insert OPA or NPA as needed
- E-C clamp (one-handed): index and thumb form C over mask, remaining fingers E under mandible to lift jaw into mask
- Two-person technique preferred: one holds two-handed mask seal while second squeezes bag
- Deliver 500–600 mL tidal volume over 1 second; rate 10–12/min (not arrest) or 10/min asynchronous during CPR
- Avoid hyperventilation (raises intrathoracic pressure, reduces venous return, worsens outcomes)
- Observe chest rise and waveform capnography
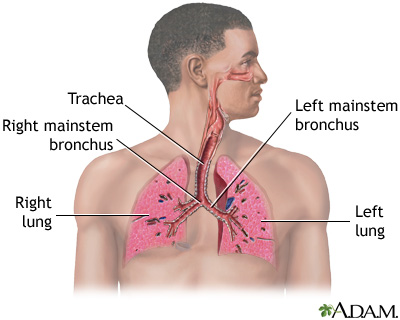
09 Endotracheal Intubation & RSI
Endotracheal intubation secures the airway with a cuffed tube, providing definitive protection against aspiration and reliable positive-pressure ventilation. Rapid sequence intubation (RSI) is the preferred technique for emergency intubation in patients at risk of aspiration: near-simultaneous administration of a potent sedative/induction agent and a neuromuscular blocker to achieve rapid unconsciousness and paralysis.
Indications for Intubation
- Failure to oxygenate (refractory hypoxemia)
- Failure to ventilate (hypercapnia, fatigue)
- Failure to protect airway (decreased GCS, active bleeding, vomiting)
- Anticipated clinical course (severe sepsis, burn, trauma transport, rising ICP)
- Procedural need (surgery, bronchoscopy)
Equipment — SOAP ME
| Letter | Item |
|---|---|
| Suction | Yankauer working, turned on, within reach |
| Oxygen | BVM with 100% O2, PEEP valve; apneic oxygenation via nasal cannula 15 L/min |
| Airways | ETT (7.0–7.5 women, 7.5–8.0 men), stylet, backup tube 0.5 smaller, OPA/NPA, LMA |
| Pharmacology | Induction agent, paralytic, vasopressors ready, post-intubation sedation |
| Monitors | Continuous SpO2, ETCO2, BP, telemetry |
| Equipment | Laryngoscope with blade (Mac 3/4 or Miller 2/3), video laryngoscope, bougie, syringe for cuff, CO2 detector, ETT holder |
RSI Drug Choices
| Agent | Dose | Onset | Notes |
|---|---|---|---|
| Induction Agents | |||
| Etomidate | 0.3 mg/kg IV | 30 sec | Hemodynamically stable; adrenal suppression concern |
| Ketamine | 1–2 mg/kg IV | 30–60 sec | Preserves BP; bronchodilator; avoid in severe HTN/ICP (controversial) |
| Propofol | 1.5–2.5 mg/kg IV | 30 sec | Causes hypotension; bronchodilator; antiemetic |
| Midazolam | 0.1–0.3 mg/kg IV | 60–90 sec | Hemodynamic instability; slower onset |
| Neuromuscular Blockers | |||
| Succinylcholine | 1.5 mg/kg IV | 30–60 sec | Duration 5–10 min; avoid in hyperkalemia, burns > 24 hr, crush, denervation, malignant hyperthermia |
| Rocuronium | 1.2 mg/kg IV | 60 sec | Duration 45–60 min; reverse with sugammadex 16 mg/kg |
| Vecuronium | 0.1 mg/kg IV | 2–3 min | Longer onset; not ideal for RSI |
The Seven P's of RSI
| Step | Timing | Action |
|---|---|---|
| Preparation | −10 min | Assess airway, gather equipment, plan failure algorithm |
| Preoxygenation | −5 min | 100% O2 via NRB or BVM for 3–5 min; apneic oxygenation via NC at 15 L |
| Pretreatment | −3 min | Fentanyl 3 mcg/kg for head injury/HTN; lidocaine controversial |
| Paralysis with induction | 0 | Push induction, immediately followed by paralytic |
| Positioning | +30 sec | Sniffing or ramped |
| Placement with proof | +60 sec | Laryngoscopy, intubate, confirm with ETCO2 and auscultation |
| Post-intubation management | +2 min | Sedation, analgesia, ventilator, CXR |

Intubation Technique — Direct Laryngoscopy
- Open mouth with scissoring right hand
- Insert Mac blade into right side of mouth, sweep tongue left
- Advance blade into vallecula (Mac) or lift epiglottis directly (Miller)
- Lift along axis of handle (45° forward) — do NOT crank on teeth
- Visualize cords; grade view (Cormack-Lehane 1–4)
- Pass ETT through cords under direct vision until cuff just below cords (21 cm at teeth in women, 23 cm in men typically)
- Remove stylet; inflate cuff with 5–10 mL air
- Confirm placement: ETCO2 (gold standard), bilateral breath sounds, absent gastric sounds, chest rise, fogging of tube
- Secure tube; obtain CXR (tip 3–5 cm above carina)
Video Laryngoscopy
Video laryngoscopes (GlideScope, C-MAC, McGrath) provide improved glottic visualization by displaying an indirect view. They are first-line for anticipated difficult airway and have become standard for most emergency intubations in many institutions. Technique differs: the tube often needs a hyperangulated stylet to navigate around the angle.
Difficult Airway Algorithm
If intubation fails: (1) optimize position, BURP (backward-upward-rightward pressure) on cricoid, bougie, larger blade; (2) limit attempts to 2–3; (3) ventilate between attempts; (4) call for help; (5) place supraglottic device; (6) if can't intubate, can't ventilate (CICV) → surgical airway.
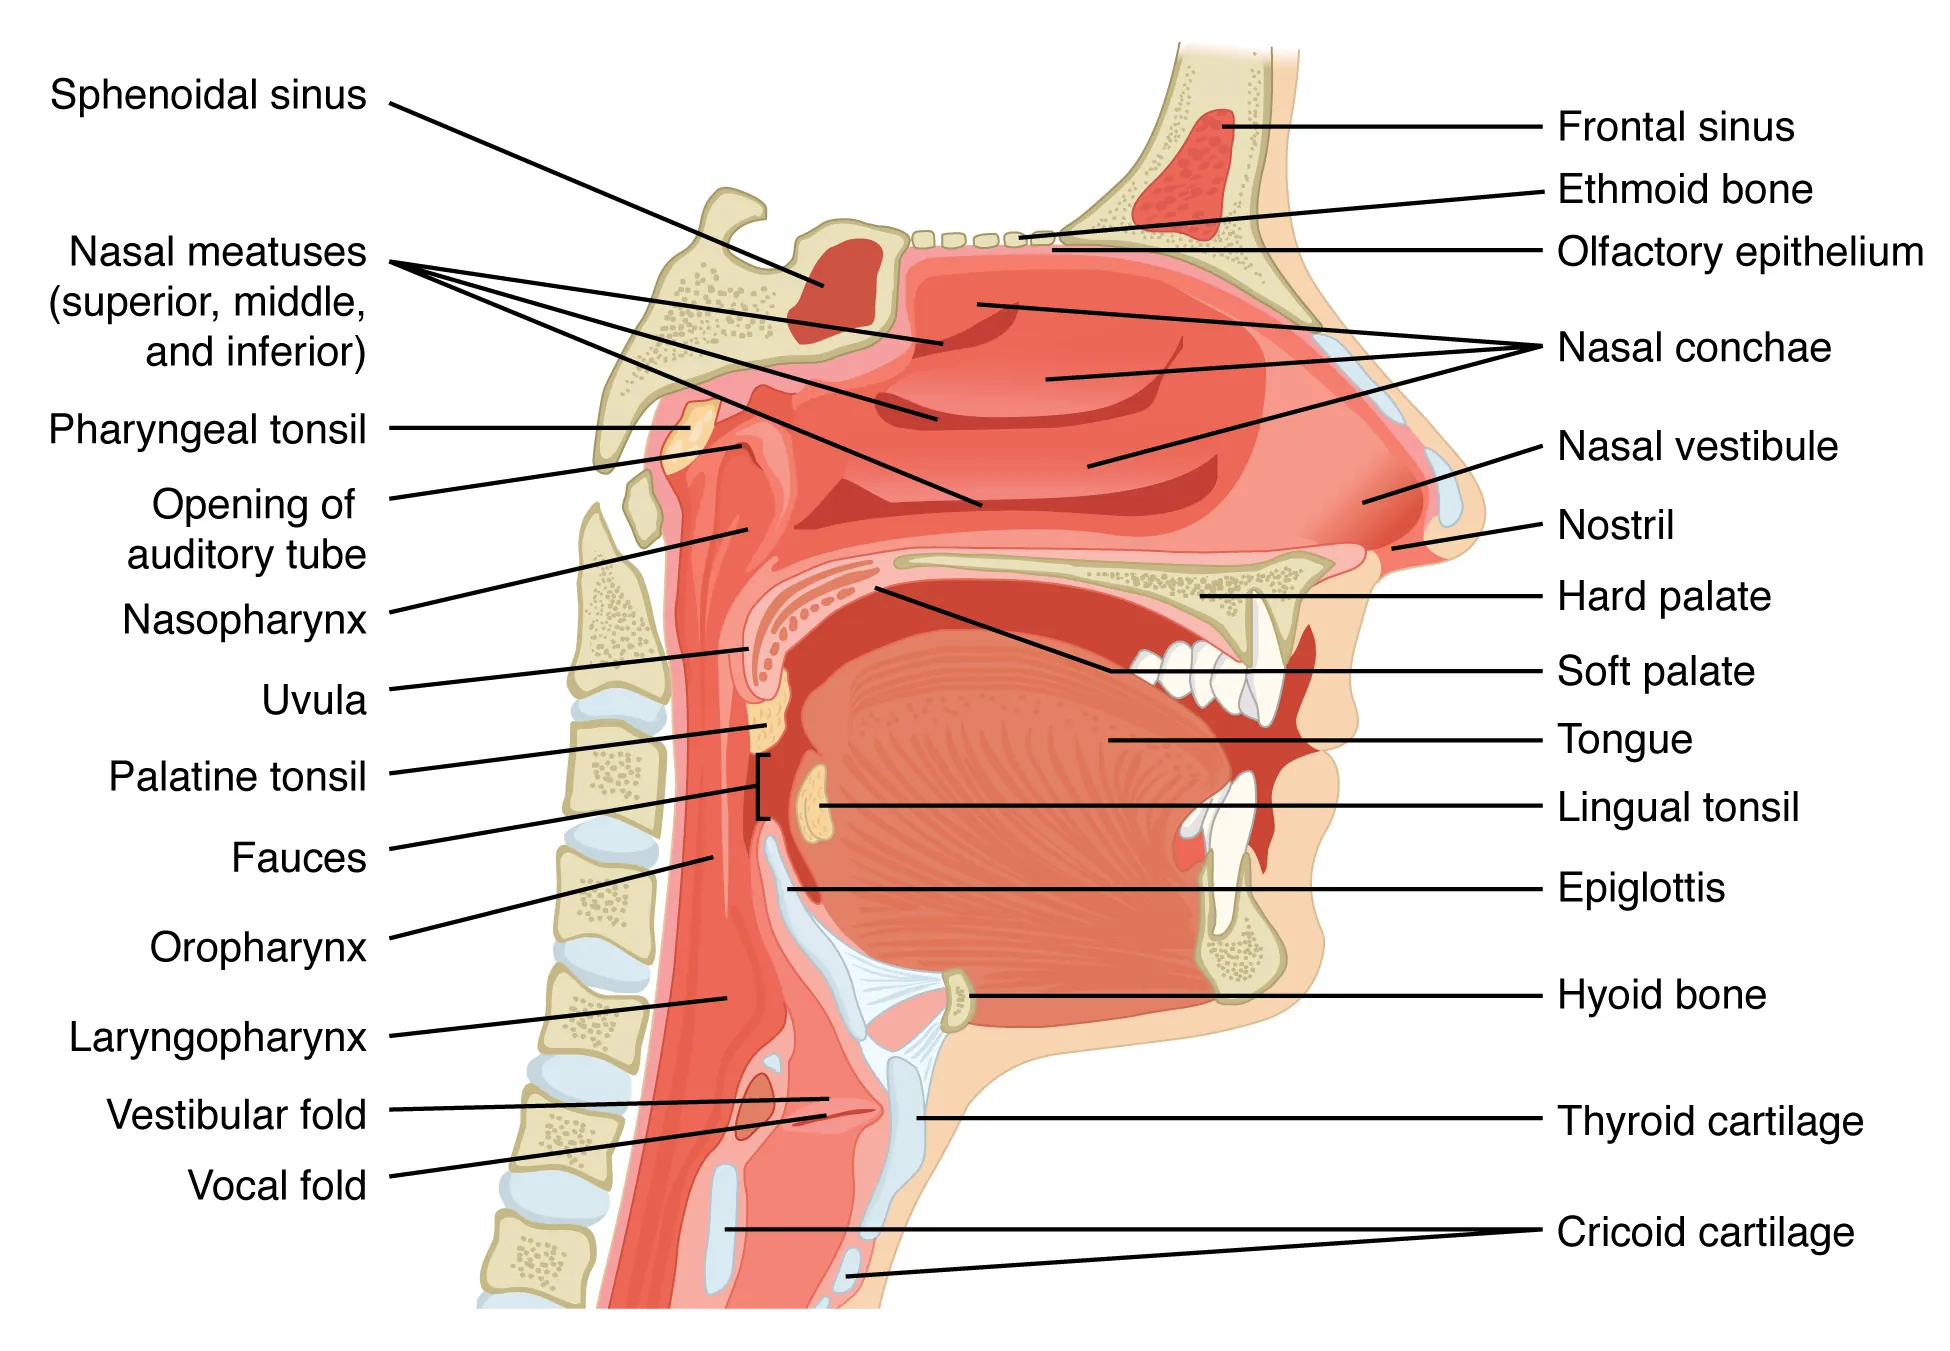
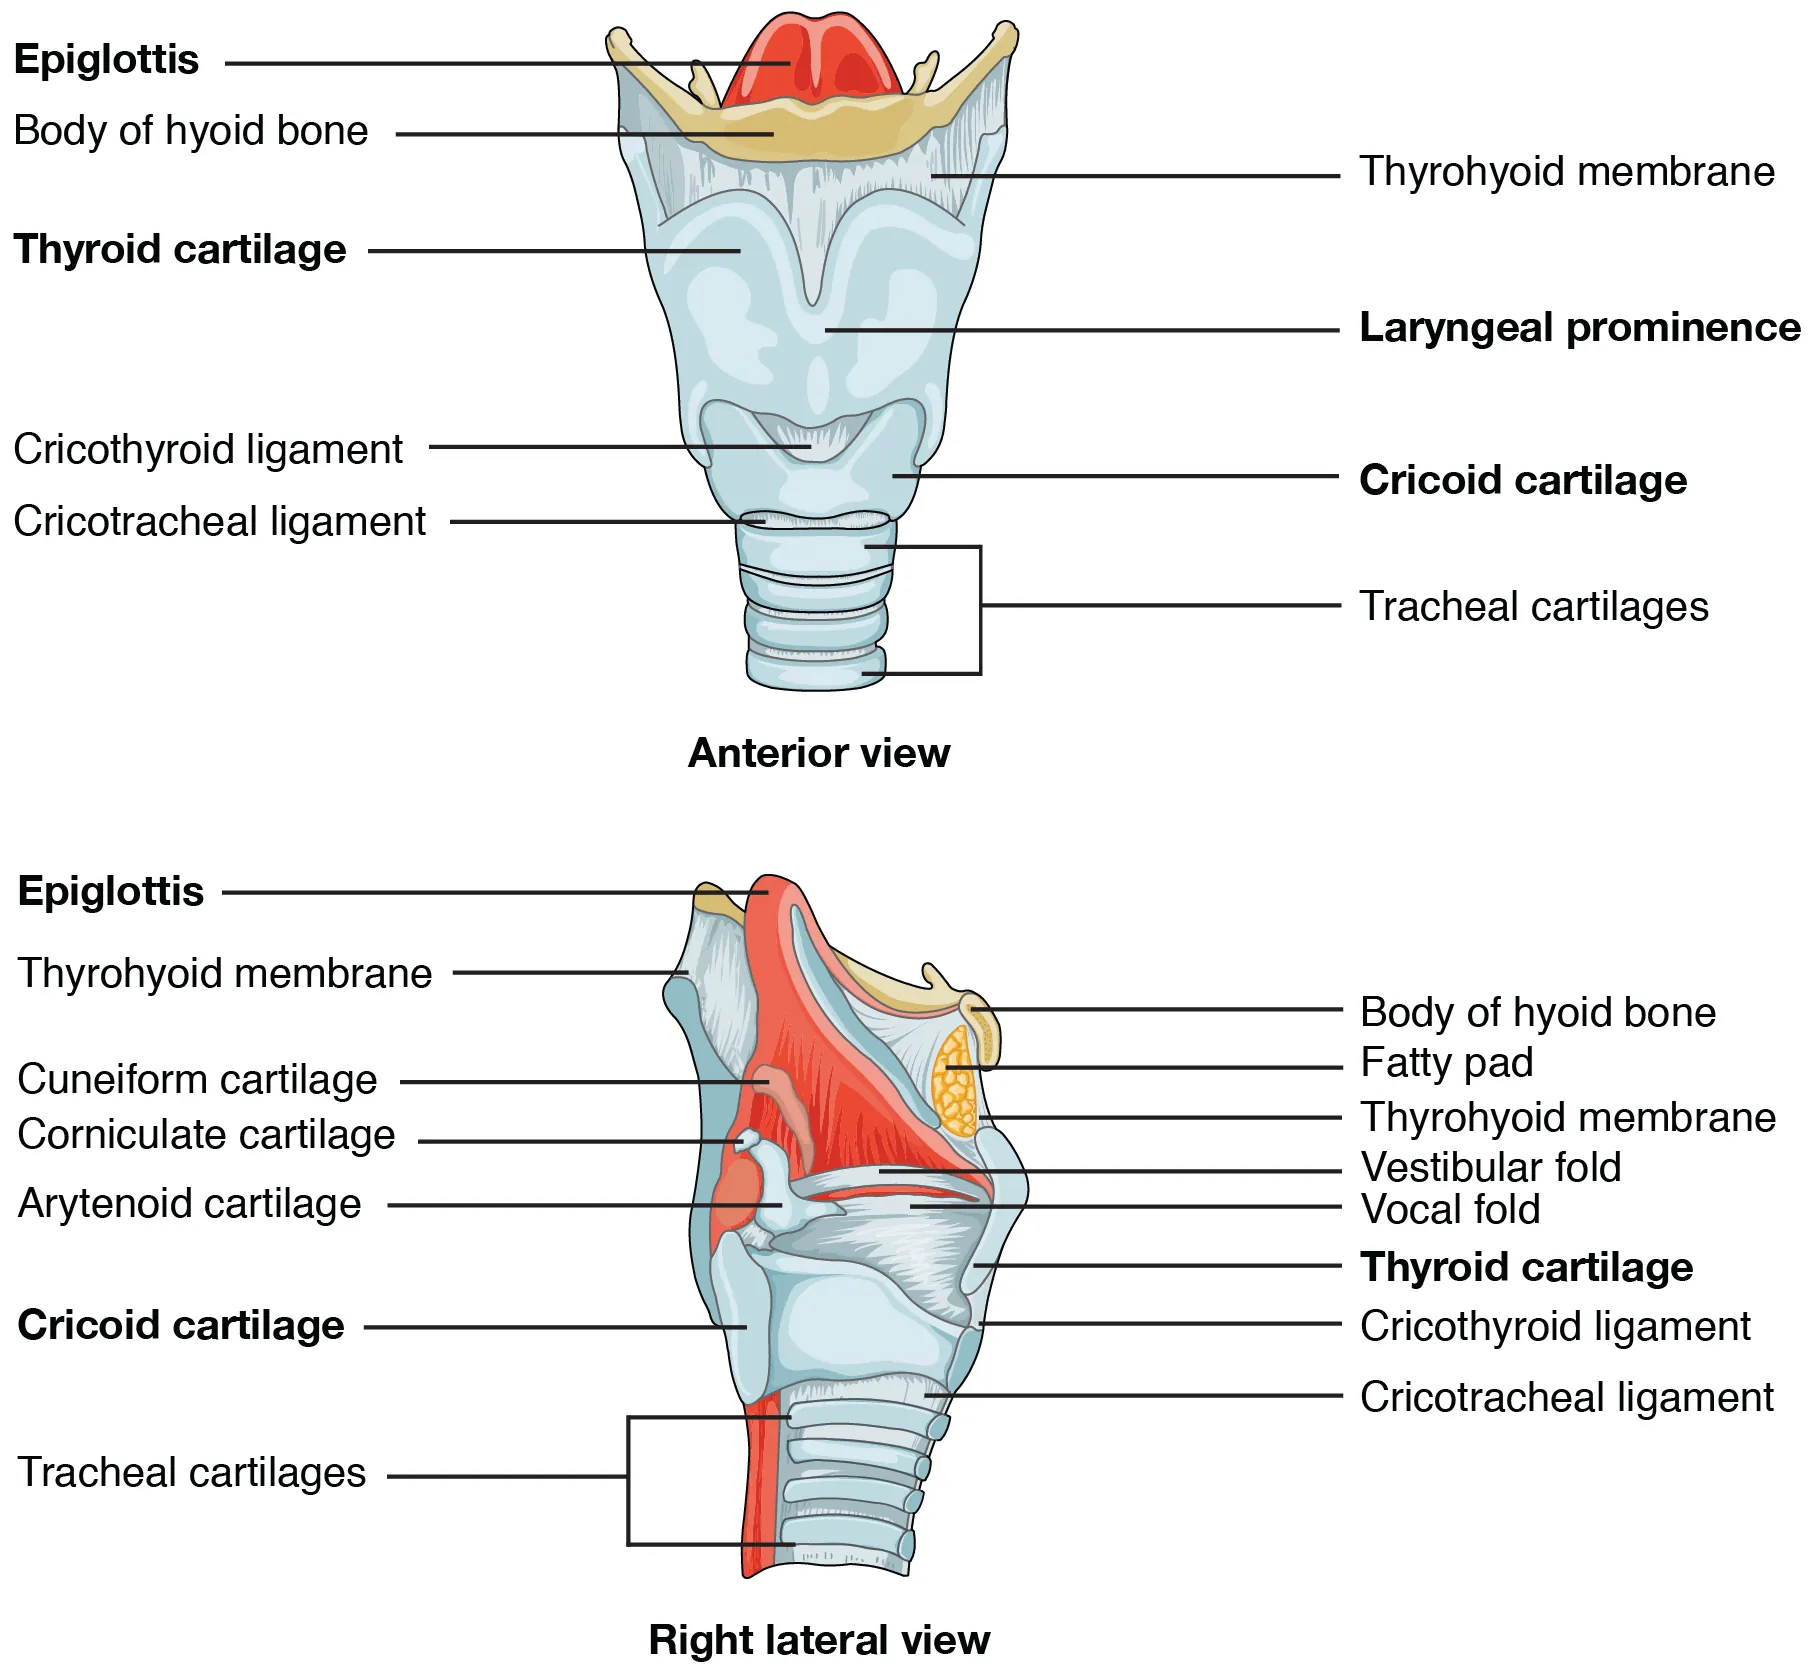
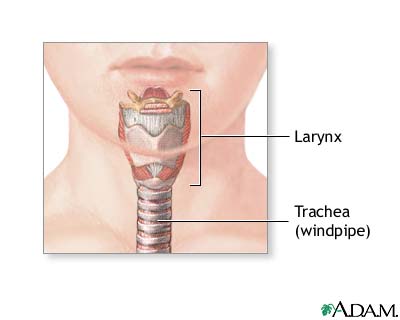
10 Surgical Airway & Tracheostomy Care
Cricothyroidotomy
Surgical cricothyroidotomy is the definitive rescue airway for "can't intubate, can't oxygenate" scenarios. It is faster and safer than emergency tracheostomy because the cricothyroid membrane is superficial and avascular. Indicated when failed intubation and inability to oxygenate by BVM or supraglottic airway.
Anatomy
The cricothyroid membrane lies between the thyroid cartilage (above) and cricoid cartilage (below), approximately 2–3 cm below the thyroid notch. Palpate the "laryngeal handshake": thumb and middle finger on the sides of the thyroid cartilage, index finger on the cricothyroid membrane.
Surgical (Scalpel-Bougie-Tube) Technique
- Extend neck; identify cricothyroid membrane
- Vertical incision through skin ~3–4 cm over membrane
- Horizontal stab through membrane with scalpel
- Rotate scalpel; insert finger to maintain tract
- Insert bougie through membrane aimed caudally
- Railroad a size 6.0 cuffed ETT or #4 Shiley over bougie
- Inflate cuff; ventilate; confirm ETCO2
- Secure; plan for formal tracheostomy within 24–72 hours
Needle Cricothyroidotomy
Alternative in pediatrics (< 10 years) where surgical cricothyroidotomy is relatively contraindicated due to small anatomy. Insert 14–16 G angiocatheter through membrane caudally; connect to high-pressure jet ventilation or BVM via 3.0 ETT adapter. Provides oxygenation but not ventilation — CO2 accumulates; limit to 30–45 minutes.
Surgical cricothyroidotomy is contraindicated in children under 10 (use needle), laryngeal fracture/transection (airway will be lost), and pre-existing tracheal pathology. Never delay if truly CICV.
Tracheostomy Care
| Issue | Action |
|---|---|
| Routine care | Clean stoma with saline; change inner cannula daily; change ties when soiled |
| Mucus plugging | Suction; saline bullets; humidification; remove inner cannula |
| Dislodgement < 7 days old | DO NOT blindly reinsert — tract not mature; bag-mask over mouth/nose, oral intubation, call ENT/surgery |
| Dislodgement > 7 days old | Mature tract; reinsert same or smaller tube; confirm placement |
| Bleeding | Minor: pressure. Pulsatile/late: rule out tracheo-innominate fistula — overinflate cuff, finger pressure in stoma, emergent surgery |
| Suctioning | Pre-oxygenate; sterile catheter; limit to 10–15 sec; monitor SpO2 |
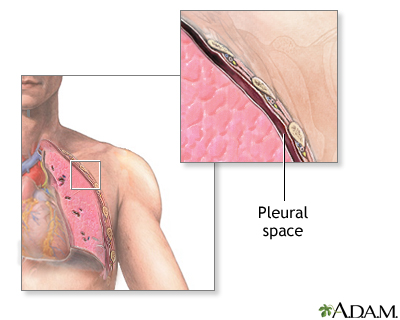
11 Thoracentesis
Thoracentesis is the aspiration of pleural fluid for diagnostic analysis or therapeutic drainage of symptomatic effusions. Ultrasound guidance has become standard of care — it reduces pneumothorax rates by > 50% and allows identification of optimal puncture site, diaphragm position, and fluid loculations.
Indications
- Diagnostic: new pleural effusion of unknown etiology
- Therapeutic: symptomatic large effusion, respiratory compromise
- Suspected empyema, hemothorax, chylothorax
Contraindications
Absolute: uncooperative patient unable to hold still. Relative: severe coagulopathy (INR > 3), platelets < 25,000, overlying skin infection, mechanical ventilation (higher PTX risk but not absolute), very small effusion, uncooperative/agitated patient.

Anatomy
The neurovascular bundle runs along the inferior border of each rib, so the needle must enter directly over the top of the rib below to avoid it. The ideal puncture site is in the posterior axillary line, one interspace below the superior margin of the effusion on US, typically the 7th–9th intercostal space. Avoid going below the 9th rib posteriorly to avoid the diaphragm and abdominal organs.
Equipment
- Thoracentesis kit: introducer needle, catheter, three-way stopcock, 60-mL syringe, drainage bag/vacuum bottle
- Sterile drape, chlorhexidine, sterile gloves, mask
- Lidocaine 1%, 10-mL syringe, 22 G and 25 G needles
- Ultrasound with phased array or curvilinear probe, sterile cover
- Specimen tubes: chemistry, cytology, microbiology, cell count
Technique
- Position patient upright leaning forward over bedside table, arms crossed
- Ultrasound: confirm effusion, measure depth, mark site at maximum fluid pocket, identify diaphragm
- Sterile prep and drape
- Anesthetize skin, subcutaneous tissue, periosteum, and parietal pleura along top of rib — aspirate frequently; fluid return confirms depth
- Insert introducer needle along anesthetized track, over the top of the rib, applying negative pressure
- When fluid returns, advance catheter over needle into pleural space
- Remove needle; attach stopcock and tubing
- Drain fluid — stop if ≥ 1.5 L removed, cough, chest pain, or procedure complete
- Have patient exhale or Valsalva during catheter removal to prevent air entry
- Apply occlusive dressing
- Post-procedure CXR or bedside US to rule out pneumothorax (if symptomatic or difficult procedure)
Pleural Fluid Analysis — Light's Criteria
Transudate vs exudate by Light's criteria — exudate if ANY of: (1) pleural fluid protein/serum protein > 0.5; (2) pleural fluid LDH/serum LDH > 0.6; (3) pleural fluid LDH > 2/3 upper limit of normal serum LDH.
| Test | Significance |
|---|---|
| pH < 7.2 | Complicated parapneumonic effusion or empyema → chest tube |
| Glucose < 60 | Empyema, rheumatoid, malignancy, TB |
| Amylase elevated | Esophageal rupture, pancreatitis, malignancy |
| Triglycerides > 110 | Chylothorax (thoracic duct injury, lymphoma) |
| Hct > 50% of serum | Hemothorax → chest tube |
| Lymphocyte predominance | TB, malignancy, chronic effusions |
| Neutrophil predominance | Parapneumonic, early empyema, PE |
Complications
Pneumothorax (~5%, less with ultrasound), hemothorax, re-expansion pulmonary edema, infection, visceral organ injury (liver, spleen, kidney), vasovagal syncope, subcutaneous emphysema, catheter fragment retention.
12 Chest Tube & Needle Decompression
Needle Thoracostomy for Tension Pneumothorax
Tension pneumothorax is a clinical diagnosis (hypotension, distended neck veins, unilateral absent breath sounds, tracheal deviation) — treat immediately without imaging. The traditional site was 2nd intercostal space, midclavicular line; recent evidence favors 4th–5th intercostal space, anterior axillary line, because chest wall is thinner there, especially in obese patients.
- Identify landmark; rapid skin prep
- Insert 14 G angiocatheter perpendicular over top of rib
- Listen for hiss of escaping air
- Remove needle, leave catheter in place
- Proceed immediately to chest tube placement
Chest Tube (Tube Thoracostomy)
Indications
- Pneumothorax: large, symptomatic, tension, or in ventilated patient
- Hemothorax
- Empyema or complicated parapneumonic effusion (pH < 7.2, loculated, pus)
- Chylothorax
- Postoperative drainage after thoracic surgery
Tube Selection
| Indication | Size |
|---|---|
| Simple pneumothorax | Small-bore 8–14 Fr pigtail |
| Hemothorax | 28–36 Fr (large-bore) |
| Empyema | 20–28 Fr; may need larger for thick pus |
| Postoperative | 24–32 Fr |
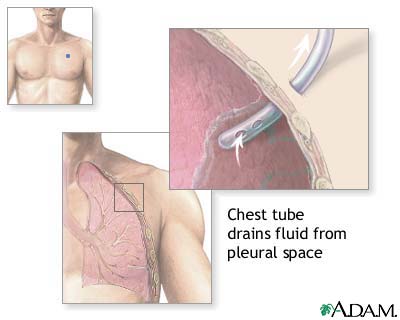
Anatomy & Landmark — The "Triangle of Safety"
Bordered anteriorly by lateral edge of pectoralis major, posteriorly by the lateral edge of latissimus dorsi, inferiorly by a line horizontal to the nipple (5th intercostal space), and superiorly by the base of the axilla. Traditional entry: 4th or 5th intercostal space, mid to anterior axillary line, just above the 5th rib.
Technique (Blunt Dissection Large-Bore)
- Position patient supine, ipsilateral arm abducted overhead
- Sterile prep, drape; full barrier precautions
- Generously anesthetize skin, subcutaneous, periosteum, and pleura
- 2–3 cm transverse skin incision at the 5th ICS mid-axillary line
- Blunt dissect with Kelly clamp over top of the 6th rib until pop through parietal pleura
- Insert finger to sweep adhesions and confirm pleural space
- Guide tube posteriorly and apically (pneumothorax) or posteriorly and basally (effusion/hemothorax); ensure all side holes are inside thorax
- Connect to Pleur-Evac (water seal); confirm tidaling and/or air leak
- Secure with horizontal mattress or purse-string suture; occlusive dressing
- CXR to confirm position and resolution
Small-Bore Pigtail (Seldinger) Technique
Ultrasound-guided Seldinger-technique pigtail catheters are first-line for simple pneumothorax and uncomplicated effusions: needle → wire → serial dilators → pigtail catheter with side holes. Less traumatic than large-bore tubes and equally effective for non-viscous fluid and air.
Drainage Systems
| Chamber | Function |
|---|---|
| Collection | Measures drained fluid volume |
| Water seal | One-way valve; tidaling indicates patent tube; bubbling = air leak |
| Suction control | Regulates applied suction (typically −20 cmH2O) |
Removal
Remove when: no air leak for 24 hours, drainage < 150 mL/day (< 2 mL/kg/hr), lung re-expanded on CXR. Technique: cut suture, have patient Valsalva (or end-expiration), pull tube in one swift motion, apply occlusive (petroleum gauze) dressing; CXR to confirm no recurrence.
Complications
Malposition (subcutaneous, fissure, extrapleural), lung laceration, diaphragmatic/intra-abdominal injury, bleeding from intercostal vessels (remember neurovascular bundle runs inferior to rib), infection, re-expansion pulmonary edema, tube dislodgement.
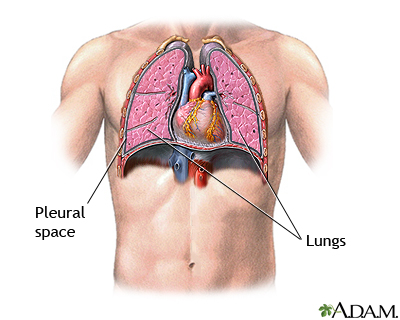
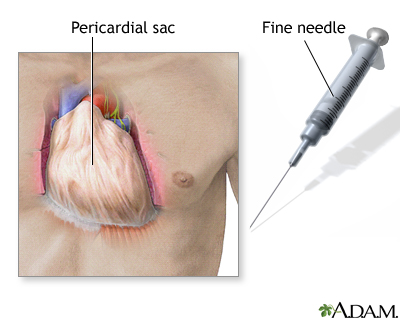
13 Pericardiocentesis
Pericardiocentesis is the percutaneous drainage of pericardial fluid, typically performed emergently for cardiac tamponade. Echocardiographic guidance has replaced blind subxiphoid approaches and has dramatically reduced complications. It is a life-saving procedure but requires careful technique to avoid myocardial puncture, coronary artery injury, and arrhythmias.
Indications
- Cardiac tamponade with hemodynamic compromise
- Large symptomatic pericardial effusion
- Diagnostic sampling (suspected purulent, malignant, or tuberculous pericarditis)
Contraindications
Relative: traumatic hemopericardium (surgical drainage preferred), aortic dissection, uncorrected coagulopathy, small (< 1 cm) effusion, loculated posterior effusion. Never delay for tamponade with instability.
Clinical Signs of Tamponade (Beck's Triad)
Hypotension, jugular venous distension, muffled heart sounds. Also: pulsus paradoxus (> 10 mmHg drop in SBP with inspiration), tachycardia, electrical alternans on ECG.
Technique (Subxiphoid Approach)
- Semi-recumbent position (30–45°)
- Echo to confirm large anterior/global effusion and plan approach
- Sterile prep, drape; full barrier precautions
- Anesthetize skin just left of xiphoid process
- Insert 18 G spinal needle (attached to saline syringe) at 30° angle, aiming toward left shoulder
- Advance slowly under continuous aspiration until fluid returns
- Confirm pericardial location: (a) agitated saline injection under echo showing bubbles in pericardium, not RV; (b) pressure transduction; (c) fluid does not clot (unlike fresh ventricular blood)
- Pass guidewire through needle; exchange needle for pigtail catheter via Seldinger
- Drain slowly (even 50–100 mL can dramatically improve hemodynamics)
- Secure pigtail, connect to closed drainage; follow-up echo
Complications
Myocardial laceration, coronary artery laceration (especially LAD or RCA), pneumothorax, hemothorax, arrhythmias (PVCs with RV contact), pneumopericardium, liver/diaphragm injury, infection, cardiac arrest.
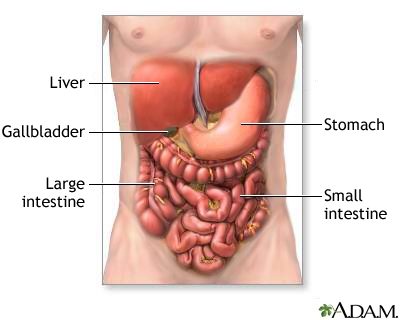
14 Paracentesis
Paracentesis is the needle aspiration of peritoneal fluid for diagnostic evaluation or therapeutic relief of tense ascites. It is one of the safest invasive procedures when performed with ultrasound guidance and is mandatory in any cirrhotic patient admitted with ascites or sepsis to rule out spontaneous bacterial peritonitis (SBP).
Indications
- Diagnostic: new-onset ascites, suspected SBP, ruling out malignancy/TB
- Therapeutic: tense ascites with dyspnea or abdominal pain, refractory ascites
- Every cirrhotic admission with ascites (diagnostic to rule out SBP)
Contraindications
Absolute: surgical abdomen requiring laparotomy, DIC with active bleeding. Relative: pregnancy, distended bladder (empty first), surgical scars/adhesions (avoid), bowel obstruction, skin infection at site.
Site Selection
The preferred site is the left lower quadrant, approximately 3–4 cm medial and superior to the anterior superior iliac spine, lateral to the rectus sheath (to avoid the inferior epigastric artery). The right lower quadrant is an alternative. Avoid surgical scars (adhesions), visibly dilated veins, and palpable organs. Ultrasound confirms fluid pocket and excludes bowel.
Equipment
- Paracentesis kit or 18–20 G angiocatheter (for ≤ 1 L) or 8 Fr catheter (large-volume)
- Vacuum bottles (1 L each) or drainage bag
- Three-way stopcock, tubing
- Sterile prep, drape, gloves
- Lidocaine 1%, 10 mL syringe
- Specimen tubes: cell count/diff, chemistry (albumin, total protein, glucose, LDH, amylase), micro (blood culture bottles), cytology
Technique (Z-Track)
- Empty bladder (or Foley if retention)
- Position supine, slight lateral tilt toward procedure side
- Ultrasound to mark site with largest fluid pocket free of bowel
- Sterile prep and drape
- Anesthetize skin, then deeper tissue in Z-track fashion (pull skin caudally before entering to create a non-linear tract that seals after removal)
- Insert catheter perpendicular, aspirating continuously; advance in 5-mm increments until fluid returns freely
- Advance catheter over needle into peritoneum; remove needle
- Attach stopcock and tubing; drain to vacuum bottles
- Large volume: drain up to 5–8 L; give albumin 6–8 g/L removed if > 5 L (prevents post-paracentesis circulatory dysfunction)
- Remove catheter; apply pressure; occlusive dressing
Ascitic Fluid Analysis
| Test | Finding | Interpretation |
|---|---|---|
| PMN count | ≥ 250/mm³ | SBP → empirical ceftriaxone + albumin |
| SAAG (serum albumin − ascites albumin) | ≥ 1.1 g/dL | Portal hypertension (cirrhosis, HF, Budd-Chiari) |
| SAAG | < 1.1 g/dL | Non-portal HTN (malignancy, TB, pancreatitis, nephrotic) |
| Total protein > 2.5 | — | Cardiac, malignant, TB ascites |
| Amylase > 100 | — | Pancreatic ascites, perforation |
| Triglycerides > 200 | — | Chylous ascites |
| Cytology | Malignant cells | Peritoneal carcinomatosis |
Complications
Persistent leak from puncture site (use Z-track), abdominal wall hematoma (inferior epigastric injury), bowel perforation, bladder perforation, post-paracentesis circulatory dysfunction (prevent with albumin), hypotension, infection, hemoperitoneum.
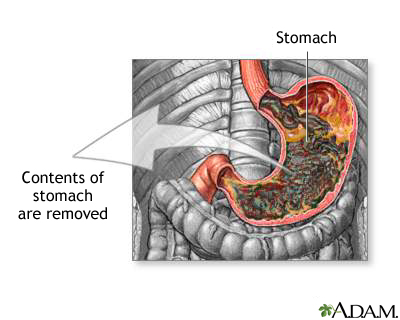
15 NG/OG Tube Placement
Nasogastric and orogastric tubes decompress the stomach, provide enteral access for feeding or medication, and allow sampling of gastric contents. While seemingly routine, NG tube placement is uncomfortable for patients and carries real risks including airway misplacement (with pneumothorax) and esophageal injury.
Indications
- Gastric decompression (bowel obstruction, ileus, gastric outlet obstruction)
- Enteral feeding (short-term)
- Medication administration in patients unable to swallow
- Gastric lavage (upper GI bleed diagnosis — controversial)
- Aspiration prevention in intubated patients
Contraindications
Absolute: severe facial/basilar skull fracture (NG via nose), esophageal obstruction/stricture, recent esophageal surgery. Relative: coagulopathy, varices (controversial), uncooperative patient.
Equipment
- 14–18 Fr NG tube (Salem sump for suction) or 10–12 Fr for feeding
- Lubricant, cup of water with straw, emesis basin
- Syringe (60 mL catheter tip), stethoscope, pH paper
- Tape, skin barrier, suction setup
Technique
- Position patient sitting upright (if possible); explain procedure
- Measure insertion length: tip of nose → earlobe → xiphoid (~50–60 cm)
- Lubricate tube generously
- Insert along floor of nose (NOT upward) perpendicular to face; advance straight back
- When tube reaches oropharynx, ask patient to flex neck and sip water; swallow during advancement
- Advance to premeasured length
- Confirm placement (see below)
- Secure to nose with tape or commercial holder
- Connect to low intermittent suction (Salem sump) or cap for feeding
Placement Verification
| Method | Reliability |
|---|---|
| Chest/abdominal X-ray | Gold standard — especially for small-bore feeding tubes |
| Gastric aspirate pH < 5 | Reliable; elevated in PPIs/tube feeds |
| Auscultation of insufflated air over epigastrium | Unreliable; can be heard with tube in lung/pleural space |
| Absence of respiratory distress | Unreliable alone |
| CO2 detection | Suggests tracheal misplacement |
Complications
Epistaxis, pharyngeal/esophageal trauma, tracheobronchial misplacement with pneumothorax (small-bore tubes > NG), sinusitis, aspiration, esophageal perforation, intracranial misplacement (basilar skull fracture), pressure necrosis of nasal alae (prevent with daily rotation).
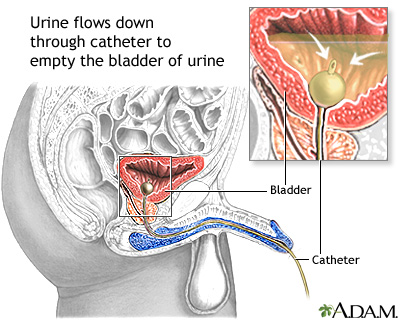
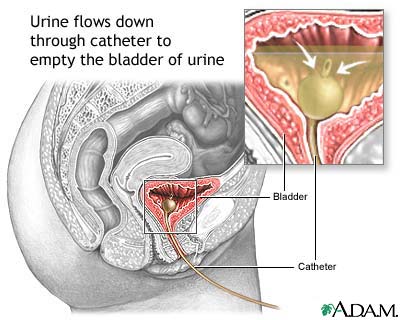
16 Urinary Catheterization
Urethral catheterization provides bladder drainage for urinary retention, monitoring of urine output in critical illness, management of incontinence with wounds, and urinary diversion after GU surgery. CAUTIs are the most common HAI — use catheters only when necessary and remove as soon as possible.
Indications
- Acute urinary retention or bladder outlet obstruction
- Accurate urine output monitoring (ICU, perioperative)
- Perioperative for selected procedures
- Healing of sacral/perineal wounds in incontinent patients
- Patient comfort in end-of-life care
Equipment & Sizing
| Type | Size/Use |
|---|---|
| Foley (2-way) | 14–18 Fr adult; balloon drainage |
| Coudé tip | For enlarged prostate (BPH) |
| 3-way irrigation | 20–24 Fr; continuous bladder irrigation (clot, post-TURP) |
| Straight (in-and-out) | Single drainage, no retention |
| Suprapubic | Percutaneous bladder puncture; long-term or urethral injury |
Male Technique
- Supine, legs extended
- Sterile gloves, drape; open kit maintaining sterility
- Non-dominant hand holds penis perpendicular to body (straightens urethra) — this hand is now non-sterile
- Cleanse glans and meatus with antiseptic, circular motion outward, x 3
- Apply lidocaine jelly into urethra; wait 2–3 minutes
- Lubricate catheter tip; insert with dominant sterile hand
- Advance until hub or urine flows; advance 2–3 cm further to ensure balloon past prostatic urethra
- Inflate balloon with 10 mL sterile water
- Gently pull back until resistance at bladder neck
- Connect to drainage bag below bladder level
Female Technique
- Supine, knees flexed and abducted (frog-leg)
- Sterile drape with fenestration over perineum
- Non-dominant hand separates labia and exposes meatus — now non-sterile; must not release until catheter in place
- Cleanse anterior to posterior, from meatus outward, x 3
- Insert catheter gently into meatus; advance 5–7 cm until urine returns
- Advance 2–3 cm further; inflate balloon
Difficult Catheterization in Men (BPH)
Use a 16–18 Fr Coudé tip catheter with the curved tip pointing up (12 o'clock) toward the anterior abdominal wall, bypassing the enlarged median lobe. Apply steady gentle pressure. If resistance persists at the bladder neck, consider urology consultation for flexible cystoscopy or suprapubic catheter — never force.
Suprapubic Catheter Placement
Indicated when urethral access fails, in urethral trauma, or for long-term diversion. Technique: ensure full bladder (ultrasound confirms), sterile prep 2 cm above symphysis pubis in the midline, anesthetize, insert trocar-catheter (Stamey or percutaneous cystostomy kit) perpendicular; advance until urine returns; inflate balloon; secure.
Complications
CAUTI (most common), urethral trauma/false passage, urethral stricture, bladder spasms, hematuria, paraphimosis (forgetting to retract foreskin back), retained Foley (balloon won't deflate — cut the valve, then inflation channel), inadvertent urethral placement of unlubricated catheter.
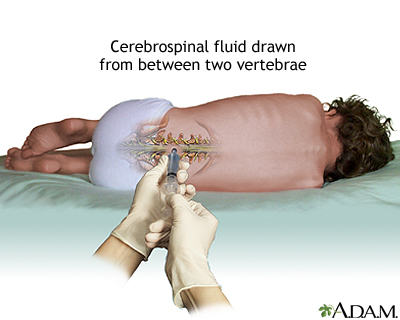
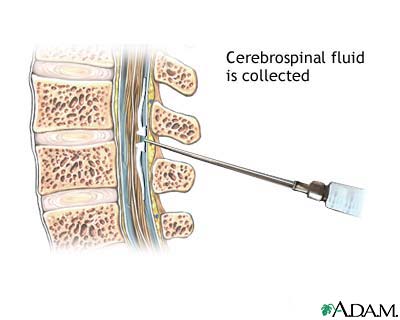
17 Lumbar Puncture
Lumbar puncture is the sampling of cerebrospinal fluid from the subarachnoid space for diagnosis of meningitis, subarachnoid hemorrhage, demyelinating disease, CNS malignancy, and measurement of opening pressure. It is also therapeutic for idiopathic intracranial hypertension and for delivery of intrathecal chemotherapy or anesthetics.
Indications
- Suspected meningitis or encephalitis
- Suspected subarachnoid hemorrhage with negative CT
- Demyelinating disease (MS), Guillain-Barré
- CNS malignancy, carcinomatous meningitis
- Normal-pressure hydrocephalus (therapeutic trial)
- Idiopathic intracranial hypertension (therapeutic)
- Intrathecal medications (chemotherapy, anesthesia)
Contraindications
Absolute: infection at puncture site, unstable patient who cannot be positioned, mass lesion with midline shift or risk of herniation. Relative: coagulopathy (INR > 1.5, platelets < 50 K), anticoagulation, spinal epidural abscess, posterior fossa mass, obstructive hydrocephalus.
When to CT First
| IDSA Criteria for CT Before LP |
|---|
| Immunocompromised state |
| History of CNS disease |
| New-onset seizure (within 1 week) |
| Papilledema |
| Abnormal level of consciousness |
| Focal neurologic deficit |
| Age > 60 |
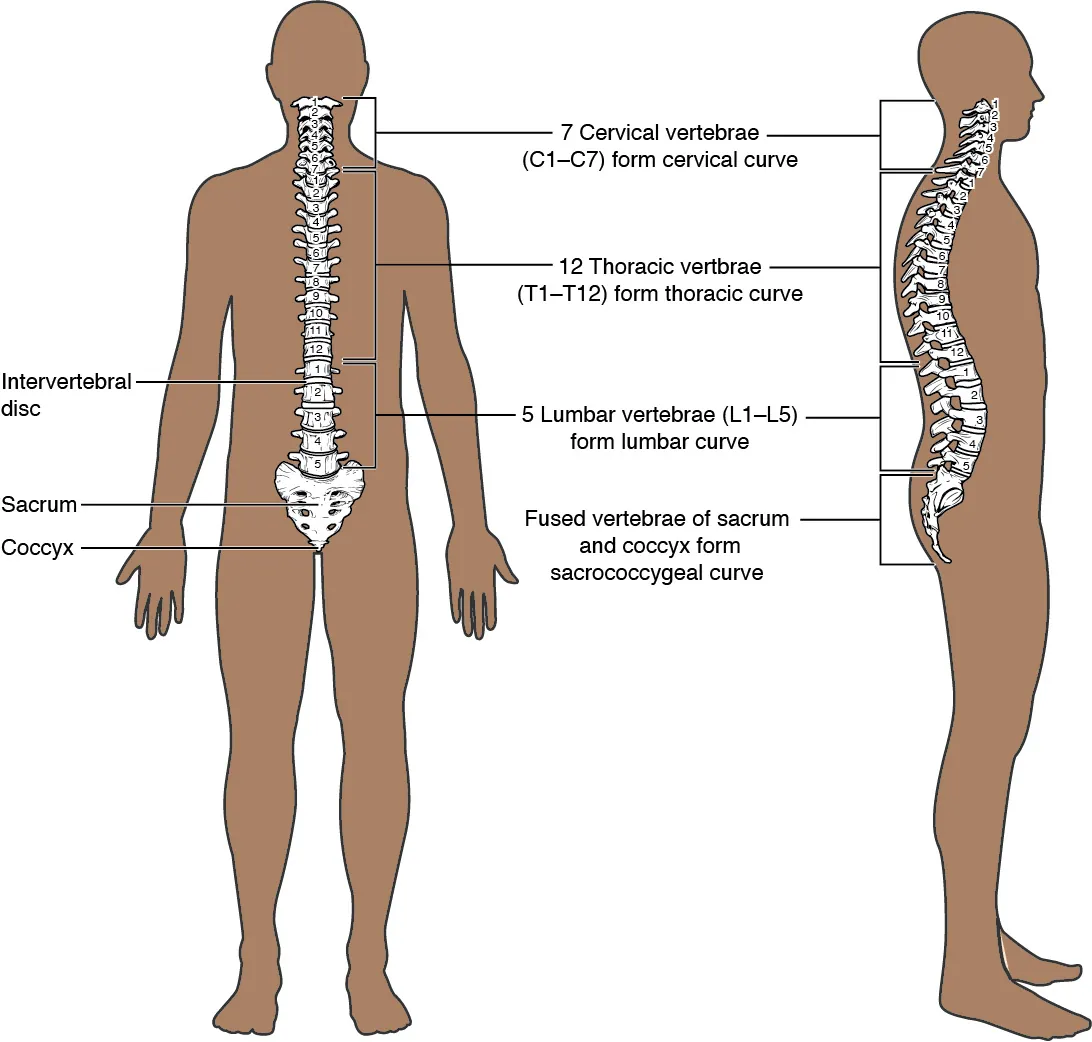
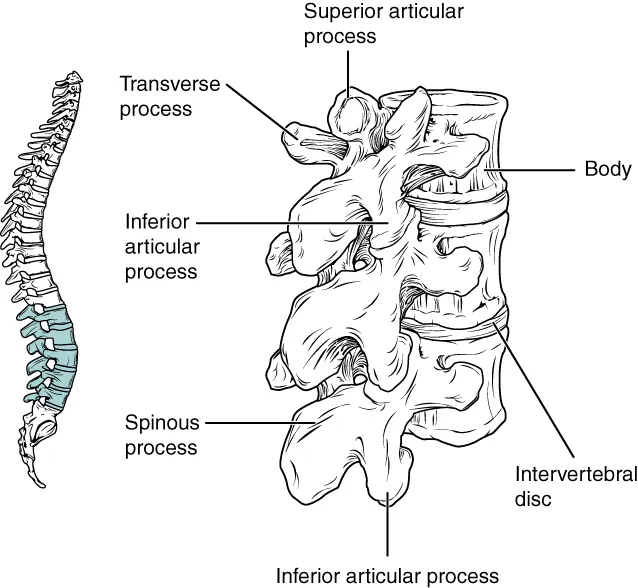
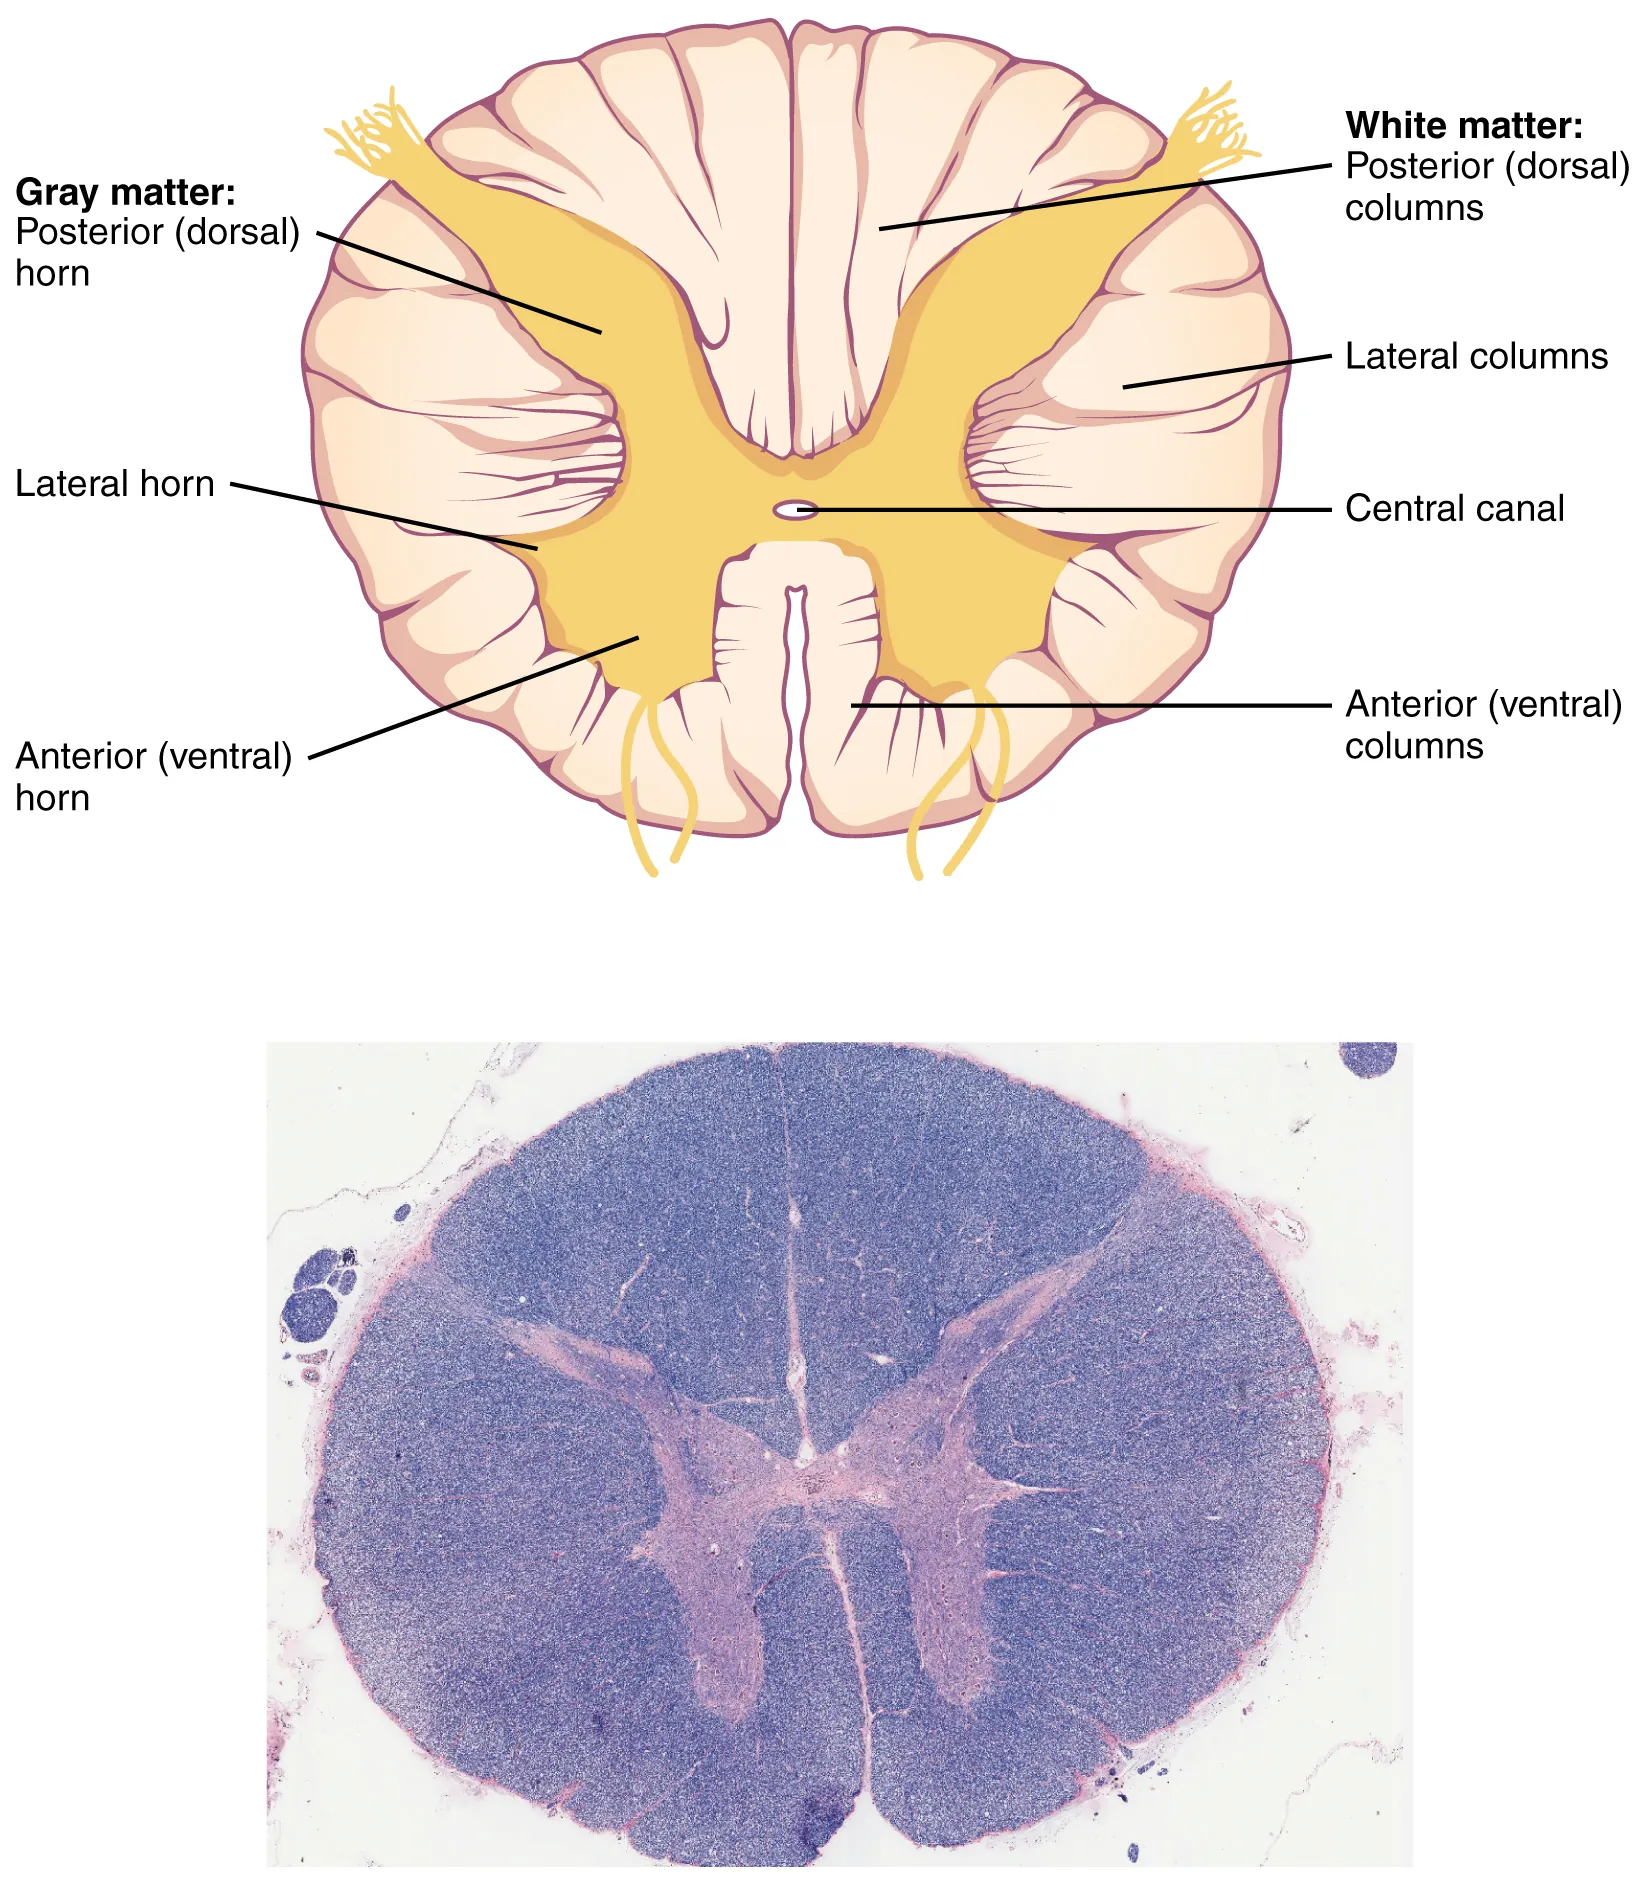
Anatomy
The spinal cord terminates at approximately L1–L2 in adults (L3 in neonates). Below this level is the cauda equina floating in CSF. Safe puncture sites are L3–L4 or L4–L5 interspaces, identified by palpating the iliac crests (Tuffier's line crosses at ~L4). The needle traverses: skin → subcutaneous fat → supraspinous ligament → interspinous ligament → ligamentum flavum (first "pop") → epidural space → dura/arachnoid (second "pop") → subarachnoid space.
Equipment
- LP tray: spinal needles (20–22 G, atraumatic/Sprotte/Whitacre preferred), manometer, 3-way stopcock, 4 specimen tubes
- Sterile drape, gloves, chlorhexidine
- Lidocaine 1%, 25 G and 22 G needles, syringe
- Ultrasound (for difficult anatomy)
Technique
- Position: lateral decubitus with knees to chest and chin to chest (fetal), OR sitting leaning forward over table. Lateral decubitus required for opening pressure.
- Palpate iliac crests; mark L3–L4 or L4–L5 interspace in midline
- Sterile prep and drape
- Anesthetize skin and deeper tissues (generous)
- Insert spinal needle with bevel parallel to dural fibers (parallel to spine in lateral decubitus); angle slightly cephalad toward umbilicus
- Advance slowly; feel "pop" as ligamentum flavum penetrated, then dura
- Withdraw stylet every few millimeters to check for CSF return
- When CSF flows, attach manometer and measure opening pressure (normal 6–25 cmH2O)
- Collect 4 tubes of CSF (1 mL each minimum): tube 1 chemistry; tube 2 micro; tube 3 cell count; tube 4 cell count (compare to #1 to rule out traumatic tap) + extra for special tests
- Replace stylet before withdrawing needle
- Apply bandage; patient may resume normal activity (bedrest does NOT prevent post-LP headache)
Complications
Post-dural puncture headache (most common, 10–30%), back pain, infection, bleeding/epidural hematoma (especially anticoagulated), herniation (avoid with CT first when indicated), nerve root irritation, failed tap.
18 Traumatic LP & CSF Interpretation
Normal CSF Values
| Parameter | Normal |
|---|---|
| Opening pressure | 6–25 cmH2O (adults, lateral decubitus) |
| Appearance | Clear, colorless |
| WBC | ≤ 5 cells/mm³ (< 30% PMN) |
| RBC | 0 |
| Protein | 15–45 mg/dL |
| Glucose | 45–80 mg/dL (2/3 of serum) |
CSF Pattern Recognition
| Pattern | WBC | Differential | Protein | Glucose | Etiology |
|---|---|---|---|---|---|
| Bacterial meningitis | 1,000–5,000 | PMN | > 100 | < 40 (< 0.4 ratio) | Bacterial |
| Viral meningitis | 50–500 | Lymphocytic | Normal to ↑ | Normal | Enterovirus, HSV, HIV |
| TB/fungal meningitis | 100–500 | Lymphocytic | ↑↑ (> 200) | ↓ | TB, Cryptococcus |
| SAH | — | — | ↑ | Normal | RBCs in all 4 tubes, xanthochromia |
| Guillain-Barré | Normal | — | ↑↑ | Normal | Albuminocytologic dissociation |
| MS | Normal or slight ↑ | Lymphocytic | Normal or ↑ | Normal | Oligoclonal bands, ↑IgG index |
Traumatic Tap vs True SAH
| Feature | Traumatic Tap | SAH |
|---|---|---|
| Tube 1 vs 4 RBC count | Decreasing | Stable (RBCs in all tubes) |
| Xanthochromia | Absent | Present (> 12 hours after bleed) |
| Clotting | May clot | Does not clot |
| Opening pressure | Normal | Often elevated |
WBC Correction for Bloody Tap
If there is bleeding into CSF, adjust WBC count: subtract 1 WBC for every 500–1,000 RBC. Alternatively, if serum WBC/RBC ratio is known, apply to CSF. This prevents over-diagnosis of meningitis in a traumatic tap.
Post-LP Headache Management
Classic presentation: positional headache worse when upright, better supine, 24–48 hours after LP, due to CSF leak from dural puncture. Conservative: bed rest, hydration, oral caffeine, NSAIDs, acetaminophen. Refractory (> 24–48 hours): epidural blood patch — 15–20 mL autologous blood injected into the epidural space at the level of the LP; > 90% success.
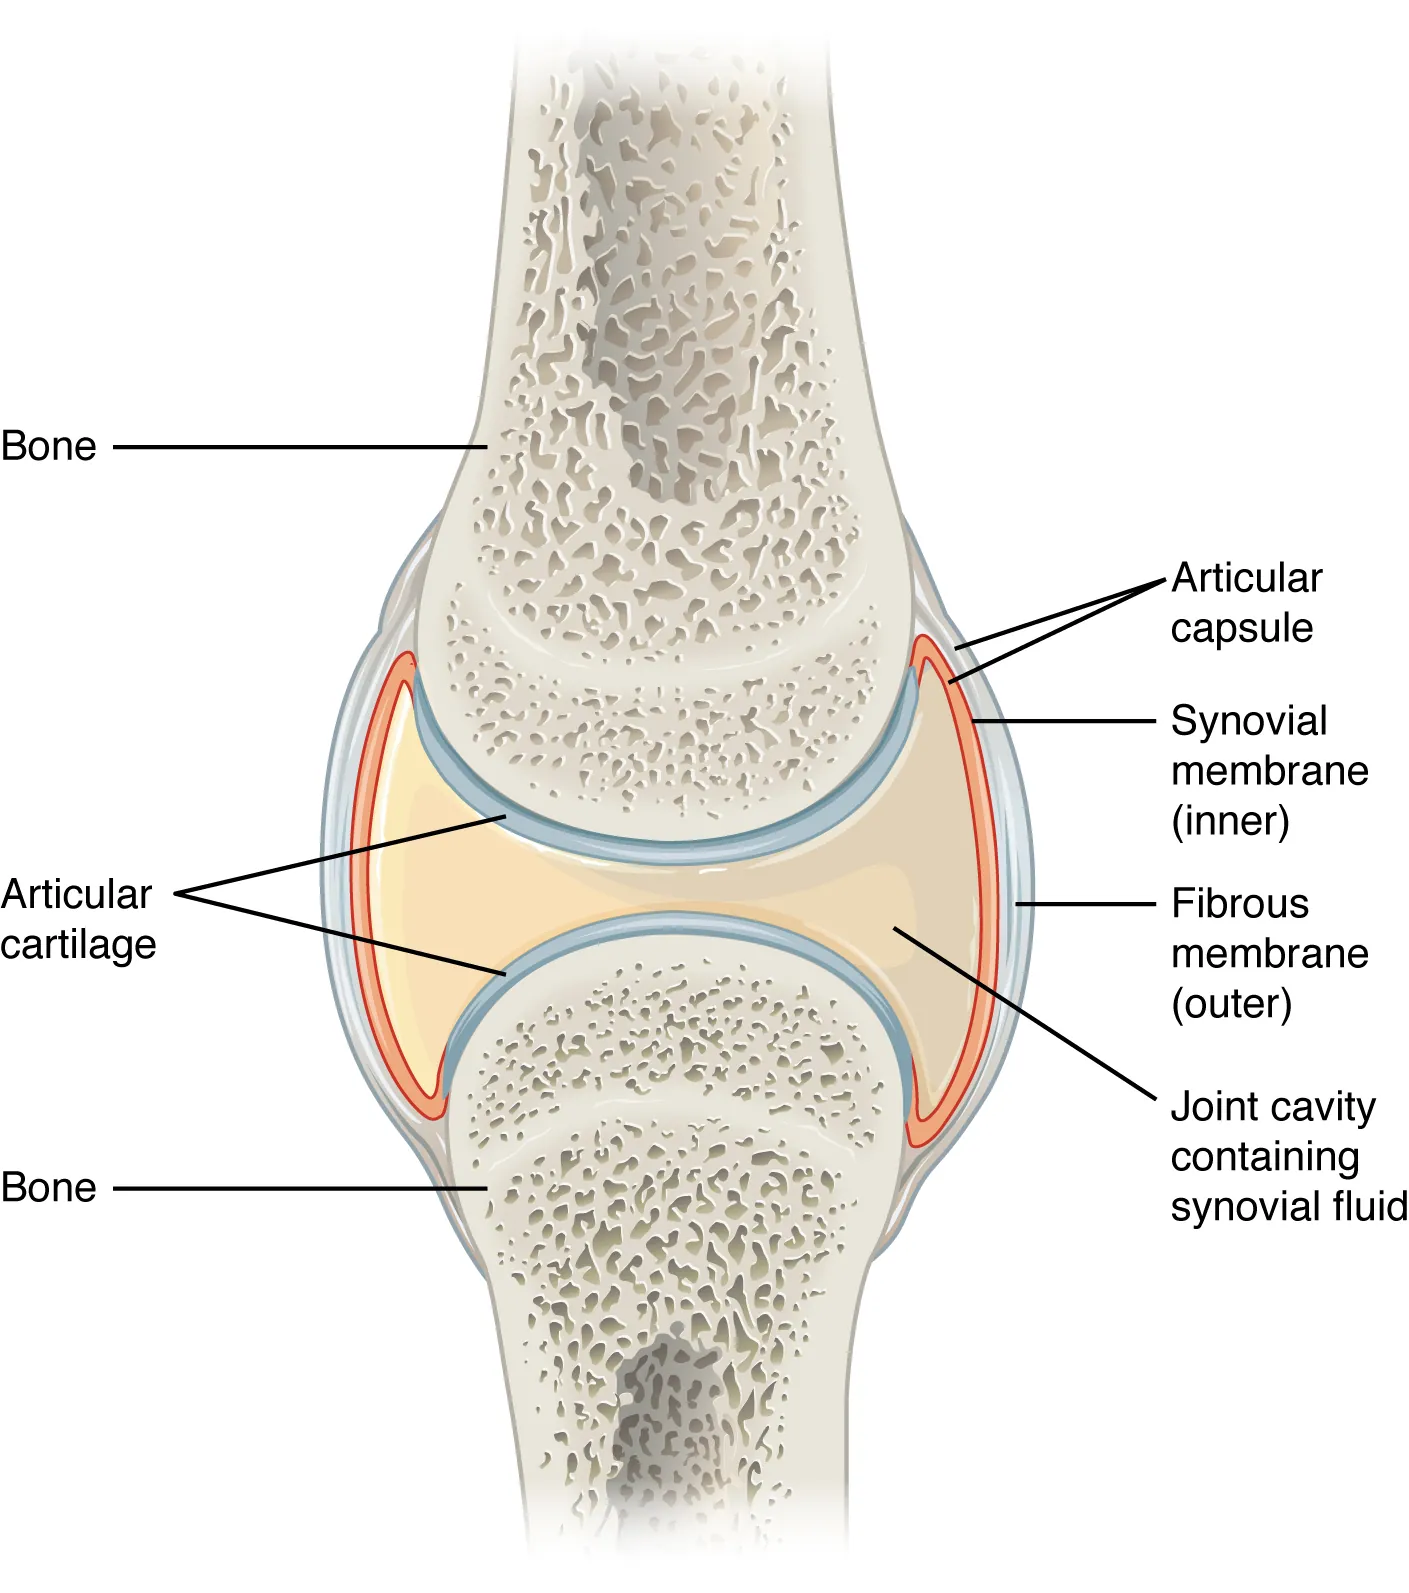
19 Joint Aspiration & Injection
Arthrocentesis is the aspiration of synovial fluid from a joint, essential for diagnosing septic arthritis (a limb- and life-threatening emergency), crystalline arthropathies, and inflammatory arthritis. The same approach is used for therapeutic injection of corticosteroids or viscosupplementation.
Indications
- Diagnostic: suspected septic arthritis, crystal arthropathy, hemarthrosis
- Therapeutic: drainage of large effusion, intra-articular corticosteroid injection
Contraindications
Absolute: overlying cellulitis/skin infection (risk of seeding joint with bacteria). Relative: coagulopathy, bacteremia, prosthetic joint (consult orthopedics), uncontrolled diabetes (for steroid injection).
Approach by Joint
| Joint | Approach | Needle |
|---|---|---|
| Knee | Supralateral (patient supine, knee extended); insert 1 cm superior and lateral to superolateral patella, aim under patella medially | 18–20 G, 1.5 inch |
| Shoulder (glenohumeral) | Posterior approach: 2 cm inferior and 1 cm medial to posterolateral acromion, aim at coracoid | 20–22 G, 1.5–3 inch |
| Subacromial bursa | Lateral under acromion | 22 G, 1.5 inch |
| Ankle | Anteromedial: medial to tibialis anterior, lateral to medial malleolus | 22 G, 1.5 inch |
| Wrist | Dorsal radiocarpal: distal to Lister tubercle, between EPL and ECRB tendons | 22–25 G, 1 inch |
| Elbow | Lateral: in "soft spot" between lateral epicondyle, olecranon, and radial head | 22 G, 1.5 inch |
| Hip | Ultrasound-guided anterior approach by trained clinicians only | — |

Technique
- Position for selected joint; identify landmarks and mark site
- Sterile prep, drape, gloves
- Anesthetize skin and subcutaneous tissue; avoid injecting anesthetic into joint
- Insert aspiration needle along planned path; apply negative pressure
- Aspirate fluid — all available if diagnostic; drain if therapeutic
- For injection: after aspiration, exchange syringe (leave needle in place) and inject steroid (e.g., triamcinolone 40 mg, methylprednisolone 40–80 mg) mixed with 1% lidocaine
- Withdraw needle; apply bandage
Synovial Fluid Analysis
| Category | WBC/mm³ | % PMN | Crystals | Examples |
|---|---|---|---|---|
| Normal | < 200 | < 25% | None | — |
| Non-inflammatory | 200–2,000 | < 25% | None | Osteoarthritis, trauma |
| Inflammatory | 2,000–50,000 | > 50% | ± | RA, gout, pseudogout, seronegative |
| Septic | > 50,000 (often > 100,000) | > 75% | None | Bacterial arthritis |
| Hemorrhagic | RBCs | — | — | Trauma, hemophilia, anticoagulation |
Monosodium urate (gout): negatively birefringent, needle-shaped, yellow parallel/blue perpendicular. Calcium pyrophosphate (pseudogout): positively birefringent, rhomboid, blue parallel/yellow perpendicular.
20 Incision & Drainage of Abscess
Cutaneous abscesses require incision and drainage as the definitive treatment — antibiotics alone are inadequate. I&D provides source control, pain relief, and diagnostic specimens.
Indications
- Fluctuant abscess on exam or ultrasound
- Hidradenitis suppurativa flare
- Pilonidal abscess
- Bartholin gland abscess (marsupialization or Word catheter)
Contraindications
Deep abscesses requiring OR (perirectal, deep neck, facial), palmar/plantar abscesses near neurovascular structures, suspected necrotizing fasciitis (needs surgical exploration).
Equipment
- Sterile prep, drape, gloves, mask, eye protection
- Lidocaine 1% (with epi if not end-artery)
- #11 or #15 scalpel
- Curved hemostat for blunt dissection
- Iodoform or plain gauze packing (¼ inch)
- Normal saline irrigation, syringe with 18 G angiocath
- Culture swab
Technique
- Confirm fluctuance; ultrasound may distinguish cellulitis from abscess
- Anesthetize skin over abscess (difficult — acidic environment; regional block more effective)
- Make a single linear incision along lines of tension (Langer's lines), full length of abscess cavity
- Express purulent material; collect swab for culture
- Insert hemostat and break up loculations gently
- Irrigate with sterile saline until clear
- Pack loosely with iodoform gauze (keeps cavity open for drainage)
- Apply absorbent dressing
- Follow-up 48 hours; re-pack or remove packing depending on drainage
When to Add Antibiotics
Simple abscess < 5 cm in immunocompetent patients: I&D alone is sufficient. Add antibiotics (TMP-SMX or clindamycin for MRSA coverage) for: systemic symptoms, extensive cellulitis, immunocompromise, recurrence, high-risk location (face, hand, genitals), inability to drain completely, > 5 cm cavity.
21 Suturing & Wound Closure
Appropriate wound closure promotes healing, reduces infection, and optimizes cosmesis. Choice of technique depends on wound depth, location, tension, and contamination. Primary closure is appropriate for clean wounds < 6–8 hours old (up to 24 hours on face due to rich blood supply); delayed primary or secondary closure for contaminated wounds.
Wound Assessment
- Mechanism (sharp vs crush vs bite vs avulsion)
- Time since injury
- Depth and involvement of tendons, nerves, vessels, bone
- Contamination, foreign body
- Neurovascular status distal to wound
- Tetanus status
Suture Selection
| Location | Size | Type | Removal |
|---|---|---|---|
| Face | 6-0 | Nylon/polypropylene | 5 days |
| Scalp | 3-0, 4-0 | Nylon/staples | 7–10 days |
| Trunk | 4-0 | Nylon | 7–10 days |
| Extremity | 4-0, 5-0 | Nylon | 10–14 days |
| Joint/hand | 5-0 | Nylon | 10–14 days |
| Foot/sole | 3-0, 4-0 | Nylon | 14 days |
| Oral mucosa | 4-0, 5-0 | Chromic gut/Vicryl | Dissolves |
| Subcutaneous | 4-0, 5-0 | Vicryl/Monocryl | Dissolves |
Suture Categories
| Type | Examples | Use |
|---|---|---|
| Absorbable monofilament | Monocryl, PDS | Deep dermal, running subcuticular |
| Absorbable braided | Vicryl, chromic gut | Deep tissue, mucosa |
| Non-absorbable monofilament | Nylon, Prolene | Skin closure (removed) |
| Non-absorbable braided | Silk | Drain securement; avoid skin (tissue reaction) |
Wound Preparation
- Universal precautions; sterile field
- Anesthetize: local infiltration or regional block
- Irrigate generously with normal saline (50–100 mL/cm wound); high pressure irrigation from syringe via splash shield
- Debride devitalized tissue and foreign bodies
- Explore full depth; assess tendon/neurovascular involvement
- Hemostasis
Suture Techniques
| Technique | Use | Notes |
|---|---|---|
| Simple interrupted | Most wounds | Workhorse; each suture independent |
| Vertical mattress | High-tension areas | Everts edges; reduces dead space; "far-far-near-near" |
| Horizontal mattress | Fragile skin, high tension | Distributes tension |
| Running (continuous) | Long linear wounds, rapid closure | Less hemostatic; risk of full dehiscence if breaks |
| Running subcuticular | Cosmesis (face, cosmetic) | No external marks; may combine with Steri-Strips |
| Deep dermal (buried) | Reduce skin tension | Absorbable; knot down |
| Corner (half-buried) | Flap tips, triangular wounds | Preserves flap circulation |
Alternatives to Sutures
| Method | Best Use |
|---|---|
| Tissue adhesive (Dermabond) | Small, low-tension, linear lacerations; not over joints or mucosa |
| Steri-Strips | Superficial, low-tension wounds; adjunct after suture removal |
| Staples | Scalp, trunk, extremity lacerations; fast; less cosmetic |
| Hair apposition (scalp) | Twist hair and glue; no shaving needed |
Wounds That Should NOT Be Primarily Closed
- Bites (especially cat, human) — irrigate, debride, leave open; consider delayed closure
- Puncture wounds
- Heavily contaminated wounds
- Wounds > 12–24 hours old (except face)
- Deep wounds with dead space
22 Splinting, Casting & Reductions
Splinting Principles
Splints are half-circumferential plaster or fiberglass used for acute immobilization, allowing for swelling. Circumferential casts are applied after swelling has subsided (often after 3–7 days). Always immobilize the joint above and below a fracture.
Common Splints
| Splint | Indication |
|---|---|
| Volar short arm | Wrist fractures, carpal injuries |
| Sugar-tong | Distal radius/ulna fractures (prevents pronation/supination) |
| Thumb spica | Scaphoid fracture, de Quervain's |
| Ulnar gutter | 4th/5th metacarpal (boxer's) fractures |
| Radial gutter | 2nd/3rd metacarpal fractures |
| Long arm posterior | Elbow and proximal forearm fractures |
| Posterior leg (short) | Ankle and foot fractures |
| Stirrup/sugar-tong ankle | Severe ankle sprain, stable ankle fracture |
| Long leg | Tibia/fibula fractures |
Technique (Generic Splint)
- Position extremity in functional position
- Apply stockinette extending beyond splint length
- Apply 3–4 layers of cast padding (Webril), overlapping by 50%, extra over bony prominences
- Measure and cut 8–10 layers of plaster/fiberglass
- Dip in room-temperature water; squeeze out excess
- Apply to padded limb; mold in desired position
- Wrap with elastic bandage (Ace); fold stockinette edges over ends
- Hold in position until set (5–10 min); check neurovascular status
- Document distal neurovascular exam, discharge instructions
Reduction Techniques
Shoulder Dislocation (Anterior)
| Method | Technique |
|---|---|
| Traction-countertraction | Sheet around torso; steady traction on arm for 5–10 min |
| Stimson | Patient prone, 10–15 lb weight hanging from wrist for 20 min |
| Scapular manipulation | Push inferior tip medially while rotating superior laterally |
| Cunningham | Seated, massage biceps with arm adducted |
| External rotation (Hennipen) | Slowly externally rotate adducted arm |
| Milch | Abduct arm overhead while applying traction and external rotation |
Always perform pre- and post-reduction neurovascular exam (especially axillary nerve function: deltoid contraction and sensation over lateral shoulder). Post-reduction X-rays to confirm and assess for Hill-Sachs or Bankart lesions.
Finger Dislocation
Most commonly PIP joint dorsal dislocation. Technique: longitudinal traction with slight hyperextension, then flexion. Splint in flexion; buddy tape; early motion to prevent stiffness.
Cardioversion for Unstable Rhythms
See Section 26 for synchronized cardioversion and defibrillation.
23 Nail & Soft Tissue Procedures
Nail Trephination (Subungual Hematoma)
Indicated for painful subungual hematoma involving > 25–50% of the nail bed. Contraindicated if associated with distal phalanx fracture (relative — many still drain to relieve pain). Technique: cautery device (Bovie, electric cautery pen) or heated paper clip applied to the nail over the hematoma; releases blood and pressure. Alternative: 18 G needle twisted through nail. Rapid pain relief.
Ingrown Toenail (Partial Nail Avulsion)
- Digital block with 1% lidocaine (no epi on digits — traditional teaching; dilute epi now shown safe)
- Apply tourniquet (Penrose or glove finger)
- Elevate affected nail edge with Freer elevator or small hemostat
- Cut nail longitudinally with English anvil or scissors from distal to proximal matrix
- Remove nail fragment with hemostat
- Debride granulation tissue
- Consider phenol ablation of nail matrix (prevents recurrence) — 88% phenol x 3 applications of 30 seconds each; neutralize with alcohol
- Petroleum gauze dressing; elevate; antibiotic ointment
Foreign Body Removal
| Type | Approach |
|---|---|
| Splinter (visible) | Grasp with forceps; pull along entry track |
| Deep splinter | Incise skin over tip; lift out |
| Metal/glass | X-ray; consider ultrasound for non-radiopaque; fluoroscopy |
| Fish hook | String-yank technique or advance and cut technique |
| Cactus spines | Elmer's glue, let dry, peel off |
| Embedded under nail | V-wedge of nail; grasp object |
Digital Block
Indicated for finger/toe procedures: injection of 1–2 mL of 1% lidocaine on each side of the proximal phalanx (web space), blocking the digital nerves. Onset in 5–10 minutes. Avoid vasoconstrictors traditionally (though recent data show dilute epinephrine is safe).
24 Skin Biopsy & Cryotherapy
Skin Biopsy Types
| Type | Technique | Indications |
|---|---|---|
| Shave | Scalpel or curved razor removes epidermis and superficial dermis | Raised lesions (seborrheic keratosis, nevi, BCC screening) |
| Punch | 3–6 mm circular blade penetrates to subcutaneous fat | Inflammatory dermatoses, rashes, deep lesion sampling |
| Excisional | Full-thickness elliptical excision with margins | Suspected melanoma, definitive treatment |
| Incisional | Wedge from larger lesion | Large lesions needing tissue diagnosis before definitive excision |
Punch Biopsy Technique
- Mark site; photograph for record
- Anesthetize with 1% lidocaine with epi (unless end-artery)
- Stretch skin perpendicular to Langer's lines (creates oval scar)
- Place punch perpendicular to skin; rotate with pressure until gives way
- Remove punch; lift specimen with forceps, cut base with scissors
- Place in formalin
- Close with single suture (4-0, 5-0) or leave small biopsy to heal by secondary intention
Cryotherapy (Liquid Nitrogen)
Applied with cotton-tipped applicator or spray device for freezing tissue. Used for actinic keratoses, seborrheic keratoses, warts, and superficial BCCs. Technique: freeze until a halo appears 1–2 mm beyond lesion; thaw; repeat cycle. Blistering and pigment changes are common.
25 ENT Procedures & Epistaxis Management
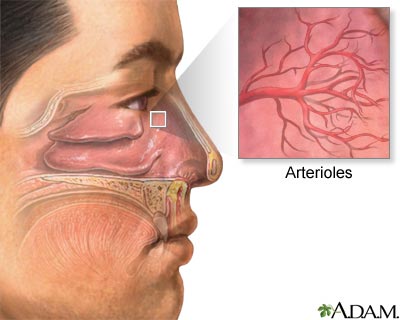
Epistaxis Anatomy
Anterior bleeds (90%): Kiesselbach's plexus on anterior nasal septum — watershed of anterior/posterior ethmoidal, sphenopalatine, and superior labial arteries. Posterior bleeds (10%): sphenopalatine artery — present with bleeding from both nares or down the throat; more common in elderly and hypertensive patients; higher mortality.
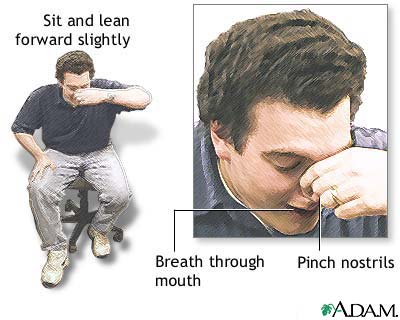
Stepwise Management
- ABCs: large-bore IV, monitors, labs (CBC, coags, T&S); correct coagulopathy
- Patient upright, leaning forward; suction clots
- Direct pressure: pinch nasal ala against septum for 10–15 min continuously
- Topical vasoconstrictor: oxymetazoline or phenylephrine spray
- Topical anesthetic: lidocaine 4% spray
- If visible bleeding site: silver nitrate chemical cautery (one side of septum only; avoid perforation)
- Anterior packing: Rapid Rhino, Merocel, or traditional ribbon gauze
- Posterior pack or double-balloon device if anterior bleeding not controlled; admit
- ENT consultation; consider endoscopic cauterization, sphenopalatine artery ligation, or embolization
Anterior Packing Technique
Rapid Rhino: soak in sterile water 30 seconds, insert fully into nare along floor; inflate with air (10–20 mL); verify bleeding stops. Merocel: insert compressed sponge fully; spray saline to expand. Both require 48–72 hour removal and prophylactic antibiotics (amoxicillin-clavulanate) to prevent toxic shock syndrome.
Cerumen Removal
| Method | Technique |
|---|---|
| Irrigation | Body-temp water with 20–60 mL syringe and angiocath; direct toward posterosuperior canal; contraindicated with perforation or known TM disease |
| Manual removal | Curette under direct visualization; requires stable patient |
| Cerumenolytics | Debrox, mineral oil x 3–5 days to soften before irrigation |
| Microsuction | ENT with microscope |
26 Cardioversion, Defibrillation & ECG
Defibrillation
Unsynchronized high-energy shock for pulseless VT/VF. Delivers energy regardless of cardiac cycle. Part of BLS/ACLS algorithm for shockable rhythms.
Technique
- Recognize pulseless VT/VF
- Apply pads: anterior (right upper chest) + lateral (left midaxillary, 5th ICS), or anterior-posterior
- Select energy: biphasic 120–200 J (device-specific); monophasic 360 J
- Charge; ensure all clear ("I'm clear, you're clear, O2 clear")
- Deliver shock
- Resume CPR immediately for 2 min, then check rhythm
Synchronized Cardioversion
Low-energy shock synchronized to the R wave for unstable tachyarrhythmias with a pulse (unstable SVT, AF with RVR, stable VT refractory to medications). Synchronization prevents shock on T wave and induction of VF.
Energy Selection
| Rhythm | Initial Biphasic Dose |
|---|---|
| Narrow regular (SVT) | 50–100 J |
| Narrow irregular (AF) | 120–200 J |
| Wide regular (VT with pulse) | 100 J |
| Wide irregular | Defibrillation doses (not synchronized) |
Procedure
- Sedate patient if conscious (etomidate, ketamine, propofol)
- Attach pads and rhythm leads; ensure "SYNC" mode on defibrillator (arrows on R waves)
- Select energy, charge, clear
- Press and HOLD shock buttons (delay until next R wave)
- Re-sync after each shock (defibrillators default back to unsynchronized)
- Escalate energy if ineffective
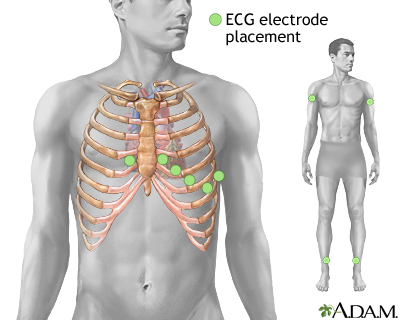
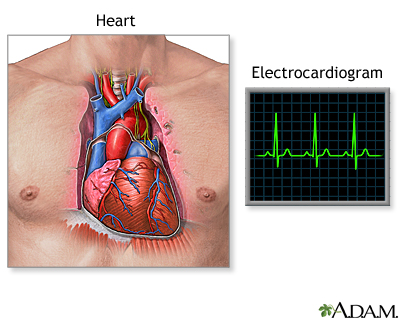
12-Lead ECG Setup
| Lead | Location |
|---|---|
| V1 | 4th ICS, right sternal border |
| V2 | 4th ICS, left sternal border |
| V3 | Between V2 and V4 |
| V4 | 5th ICS, midclavicular line |
| V5 | Same level as V4, anterior axillary line |
| V6 | Same level as V4, midaxillary line |
| RA/LA | Right and left arm (wrists) |
| RL/LL | Right and left leg (ankles) |
Posterior leads (V7–V9) for suspected posterior MI. Right-sided leads (V3R, V4R) for suspected RV infarction in inferior STEMI.
27 Complications, Checklists & Templates
Master Procedure Complications Matrix
| Procedure | Most Common Complication | Most Serious Complication |
|---|---|---|
| Peripheral IV | Infiltration | Sepsis from extended dwell |
| Arterial line | Hematoma/vasospasm | Distal ischemia |
| CVC (IJ) | Carotid puncture | CLABSI, PTX |
| CVC (subclavian) | PTX | Hemothorax, subclavian laceration |
| CVC (femoral) | Hematoma | Femoral artery injury, DVT, infection |
| Intubation | Dental trauma, hypoxia | Esophageal intubation, aspiration |
| Thoracentesis | PTX | Hemothorax, re-expansion edema |
| Chest tube | Malposition | Lung/diaphragm injury |
| Paracentesis | Leak | Bowel perforation, bleeding |
| NG tube | Epistaxis | Tracheobronchial misplacement |
| Foley | CAUTI | Urethral trauma/stricture |
| Lumbar puncture | Post-dural puncture headache | Herniation, epidural hematoma |
| Pericardiocentesis | Arrhythmia | RV perforation, coronary injury |
| Joint aspiration | Bleeding | Iatrogenic septic arthritis |
| I&D | Recurrence | Facial vein extension (cavernous sinus) |
| Suturing | Wound infection | Missed tendon/nerve injury |
Emergency Procedure Kits — Core Contents
| Procedure | Minimum Equipment |
|---|---|
| RSI/Intubation | Laryngoscope (Mac 3/4, Miller 2/3), video laryngoscope, ETT 6.5–8.5, stylet, bougie, suction, BVM, end-tidal CO2, tape, induction/paralytic drugs, LMA backup, crich kit |
| Central line | Full barrier kit (cap, mask, gown, gloves, drape), chlorhexidine, CVC kit with wire/dilator/catheter, lidocaine, flush, sutures, US with sterile cover, CXR order |
| Chest tube | Kelly clamp, scalpel, chest tube (varies by size), Pleur-Evac, sutures, petrolatum gauze, suction tubing, sterile drapes, lidocaine |
| Lumbar puncture | LP kit, atraumatic spinal needle 22 G, manometer, 4 tubes, lidocaine, drape, chlorhexidine |
| Paracentesis/thoracentesis | Integrated kit with catheter/needle, drainage bag/vacuum bottles, stopcock, US, lidocaine, drape, specimen tubes |
Post-Procedure Note Template
Procedure: [e.g., Right internal jugular central venous catheter placement]
Indication: [e.g., Vasopressor administration in septic shock]
Consent: Informed consent obtained from [patient/surrogate] with discussion of risks, benefits, alternatives.
Time-out: Performed with team; correct patient/site/procedure verified.
Prep: Full barrier precautions (cap, mask, sterile gown, gloves, full drape). Chlorhexidine prep; allowed to dry.
Anesthesia: 5 mL of 1% lidocaine infiltrated locally.
Technique: Under real-time ultrasound guidance, right IJ vein cannulated on first pass. Guidewire passed easily. Catheter advanced to 15 cm. All lumens flushed and aspirated freely. Catheter secured with suture. Sterile dressing applied.
Estimated blood loss: Minimal.
Complications: None.
Post-procedure: Patient tolerated well. CXR ordered to confirm position and exclude pneumothorax.
Sedation & Analgesia Reference Table
| Scenario | Typical Drug/Dose |
|---|---|
| Awake LP, thora/para | 1% lidocaine local; optional low-dose fentanyl 25–50 mcg IV |
| CVC placement | 1% lidocaine; consider midazolam 1 mg IV if anxious |
| Chest tube | Generous lidocaine + parenteral analgesia (morphine/fentanyl) ± ketamine 0.1–0.3 mg/kg |
| I&D abscess | Regional block if feasible; procedural sedation for large/multiple |
| Laceration repair | Local infiltration; LET/EMLA in children |
| Joint reduction | Procedural sedation (propofol or ketofol); intra-articular lidocaine for shoulder |
| Cardioversion | Etomidate 0.1 mg/kg or propofol 0.5–1 mg/kg IV |
28 High-Yield Review
Procedure Pearls — One-Liner Reminders
Emergency Procedure Checklist Summary
| Step | Detail |
|---|---|
| 1. Indication | Is this procedure truly necessary? Benefits outweigh risks? |
| 2. Consent | Signed, witnessed, risks/benefits/alternatives explained |
| 3. Labs | CBC, coags as appropriate; correct clinically significant abnormalities |
| 4. Position | Optimal for patient anatomy and operator ergonomics |
| 5. Equipment | All items at bedside before starting; ultrasound ready |
| 6. PPE | Appropriate level (clean → sterile → maximum barrier) |
| 7. Time-out | Patient, procedure, site, allergies verified with team |
| 8. Anesthesia | Adequate local or systemic; reassess during procedure |
| 9. Sterile field | Prep, drape, maintain throughout procedure |
| 10. Technique | Deliberate; ask for help early if difficult |
| 11. Confirmation | Verify success before proceeding (imaging, waveform, aspirate) |
| 12. Documentation | Procedure note; complications; post-procedure orders |
| 13. Post-procedure care | Monitoring, imaging, follow-up plan |
For procedure-based questions: (1) Identify the indication and contraindication first. (2) Know the anatomic landmark and the reason (e.g., neurovascular bundle runs inferior to the rib). (3) Recognize the most common complication and its prevention/management. (4) Understand confirmation of correct placement (waveform, imaging, fluid return). (5) Master the "when not to" — timing of closure for bite wounds, when to CT before LP, when a catheter cannot be reinserted in an immature tracheostomy tract. These five skills anchor safe bedside practice and answer the vast majority of procedure questions.